Showing posts with label ombré. Show all posts

Saturday, 18 July 2015

Geometric Gradient Nails

Hi!

Originally I wasn't going to write a full post for this design, but I ended up using so many polishes that I thought it would be best to write them all here! 

This is my geometric gradient design that I created for the Weekly Nail Art Challenge on Instagram.

geometric-gradient-nails-wnac
WNAC - Geometric Gradient Nails
I started off with a base of OPI 'My Boyfriend Scales Walls' and let dry, then I applied striping tape in a criss-cross pattern with a piece of tape running up the centre of my nail. I created a gradient on each nail by sponging two different polishes of each colour (plus 'My Boyfriend Scales Walls') on each nail:

Blue = Barry M 'Damson' / Rimmel 'Mind The Gap, Victoria'
Yellow = Sally Hansen 'Butter-Fly Stroke' / Essence 'Love Is In The Air'
Green = Rimmel 'Sea Green' / Barry M 'Green Berry'
Pink = China Glaze 'Sexy Lady' / Barry M 'Strawberry Ice Cream'
Purple = Models Own 'Pukka Purple' / Barry M 'Prickly Pear'

geometric-gradient-nails-wnac

geometric-gradient-nails-wnac

Thanks for reading!

Helen x

As always, head over to Instagram to see all of the entries into the Weekly Nail Art Challenge - just search #wnac2015 :)

Tuesday, 30 June 2015

NEON WEEK: Radial Gradient and Stamping

Hi!

I've been *loving* the weather here over the last few days and today we saw the temperature reach 30 degrees Celsius which is lovely! I'm so glad I have a neon theme going on at the moment because it's complimenting the sunshine wonderfully :)


neon-radial-gradient-stamping
 Stamped Neon Radial Gradient

Today's nails include a technique that I have only tried a couple of times - a radial gradient (where the gradient works outwards from the centre of the nail, rather than horizontally or vertically across the nail). I found it really difficult to get consistent gradients across all ten fingers, but I'm pretty happy with the results anyway. I added a pretty circular-style stamped image, and of course I had to stick some sparkly gems on there too!

The polishes used for this were all Models Own - 'Bikini' (yellow), 'Sun Hat' (pink) and 'Pukka Purple'. I used Pukka Purple and Bundle Monster stamping plate #BM-618 for the design. Oh, and a sprinkling of China Glaze 'Fairy Dust' was added to the gradient.

neon-radial-gradient-stamping
My left hand came out better than my right hand (even though I'm left handed...)

neon-radial-gradient-stamping
FYI my stamping is *meant* to be off-centre...

neon-radial-gradient-stamping
A bit blurry but look at the pretty Fairy Dust! <3

Hope you like them :)

Thanks for reading!

Helen x

Wednesday, 10 June 2015

Monarch Butterfly Manicure

Hi everyone!

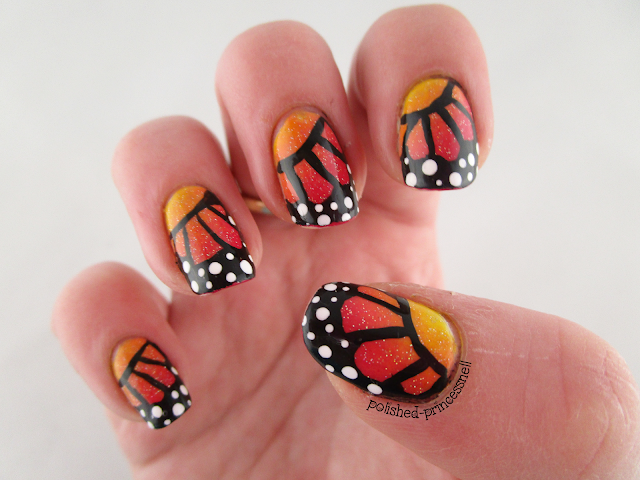
Today's manicure is inspired by the beauty of butterfly wings! Monarch (butterfly) nails are super popular in the nail world at the moment. I've never tried it before but it was surprisingly simple and the effect is stunning.

Here is the finished look:

nails-gradient-monarch-butterfly-wings
Monarch Butterfly Nails
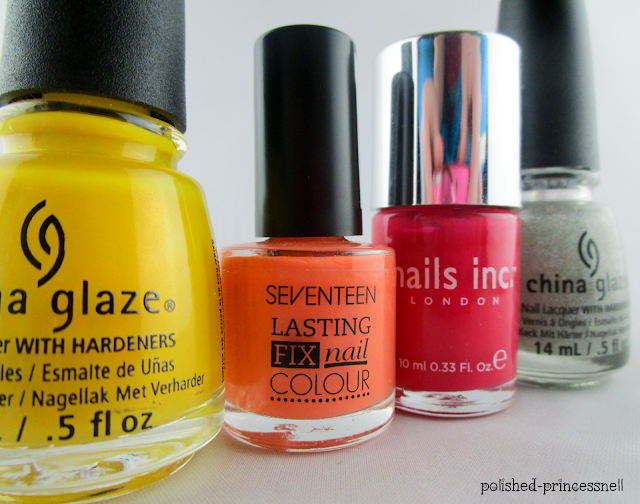
I wanted to keep with the colours of a typical monarch butterfly using a gradient of yellow through to deep pink (which is meant to be red, but I just can't resist pink!). I decided to use my new favourite yellow polish - China Glaze 'Sun's Up Top Down', along with Seventeen 'Orange Soda' and Nails Inc. 'Notting Hill Carnival'.  Of course nothing is quite complete without a sprinkling of China Glaze 'Fairy Dust'!


nails-gradient-monarch-butterfly-wings
L-R: Sun's Up Top Down / Orange Soda / Notting Hill Carnival / Fairy Dust
I began by creating a gradient from the corner of my nail, then added the detail using a small brush and black and white acrylic paint. Finally, I gave it a good coat of Glisten & Glow 'HK Girl', which is still in first place as my favourite quick-dry topcoat.


nails-gradient-monarch-butterfly-wings
How cool would it be if butterflies were sparkly in real life?!

nails-gradient-monarch-butterfly-wings
Monarch Butterfly Manicure

nails-gradient-monarch-butterfly-wings
Sparkly Gradient Monarch Butterfly Nails

 One day soon I *will* have the skills to make my striping neater and more consistent, but until them I'm still very happy with how these turned out :)

Thanks for reading!

Helen x

Friday, 3 April 2015

Stamping Over Ombré Nails - MoYou London Princess Collection

Hello lovelies!

After a busy few days of visiting family 300 miles away I am now back to the lovely city of Bristol and have been working on a pretty little ombré manicure for you all, stamped over with MoYou Princess collection plate #10. I've been wanting to do something like this for a while and my nails are now long enough for it to be worthwhile!

I wanted this to be very feminine and pretty, so I chose some cute pinks to make my ombré with - Rimmel 'Rose Libertine', Essie 'Flawless', and Rimmel 'Lose Your Lingerie'. I prepped my nails before sponging with Barry M 'Matt White' to ensure that my pinks were bright enough on the nail. 

L-R: Rose Libertine / Flawless / Lose Your Lingerie / Matt White


I think this is actually my first ombré (different tones of the same colour hue), as I usually do gradients (different colours blended together). I absolutely love how the ombré turned out, and couldn't resist snapping a few pics before I stamped all over it! 

My first attempt at ombré nails

I recently picked up my MoYou London Princess set from Boots (available to buy online here), and hadn't tried it out. I love the branding that MoYou London have - it reminds me slightly of Soap and Glory (also available from Boots)! The Princess Collection is really sweet, and includes lots of cutesy designs from hearts and flowers to raindrops and bunnies! It's adorable!

I used plate number 10 and I have circled the particular image below. I chose two designs from the plate - interlocking love hearts and butterflies, alternating on each nail. Stamping in white allowed the patterns to 'fade' into the lighter part of the ombré.

MoYou London Princess Collection

Stamped using MoYou London Princess plate #10

My cuticles are in awful shape at the moment, so I apologise for the raggedy dryness. I'm using extra amounts of my favourite cuticle rescue treatment Lemony Flutter Cuticle Butter which is available from Lush here. It smells amazing and you can feel the goodness seeping into your nails and cuticles when you apply it. If you haven't tried it I highly recommend you do!

I love this mani and hope that I continue to improve my stamping so I can really start incorporating the technique into other nail designs.

Thanks for reading!

Helen x