Showing posts with label sparkle. Show all posts

Saturday, 1 August 2015

Travel In Colour Gradient Nails

Hi everyone!

This post was meant to have some nail art in it, but I liked the base to the art so much that I have dedicated a whole post to it! Let's take a look:

gradient-nail-art-travel-in-color-china-glaze

I used three colours to create a mix of gradients: OPI 'Ski Teal We Drop', Barry M 'Sugarplum' and Maybelline 'Grey Beats'. I added one coat of China Glaze 'Travel In Color' to each nail and topped with Ciate Speed Pro Topcoat.

gradient-nail-art-travel-in-color-china-glaze

gradient-nail-art-travel-in-color-china-glaze

gradient-nail-art-travel-in-color-china-glaze

'Ski Teal We Drop' by OPI is, as the name suggest, a dark teal colour, however this was hidden by the glitter topper goodness of China Glaze. The topper made the colours below it shift to beautiful purples, pinks, golds, blues and greens - so pretty! The photo below kind of demonstrates this over the teal and grey polish gradient.

gradient-nail-art-travel-in-color-china-glaze

I actually added some nail art to this after taking these pics, but I'm unsure as to whether I will post them as they were a bit rubbish. This is definitely a set of nails that look best left simple!

gradient-nail-art-travel-in-color-china-glaze

Thanks for reading!

Helen x

Tuesday, 30 June 2015

NEON WEEK: Radial Gradient and Stamping

Hi!

I've been *loving* the weather here over the last few days and today we saw the temperature reach 30 degrees Celsius which is lovely! I'm so glad I have a neon theme going on at the moment because it's complimenting the sunshine wonderfully :)


neon-radial-gradient-stamping
 Stamped Neon Radial Gradient

Today's nails include a technique that I have only tried a couple of times - a radial gradient (where the gradient works outwards from the centre of the nail, rather than horizontally or vertically across the nail). I found it really difficult to get consistent gradients across all ten fingers, but I'm pretty happy with the results anyway. I added a pretty circular-style stamped image, and of course I had to stick some sparkly gems on there too!

The polishes used for this were all Models Own - 'Bikini' (yellow), 'Sun Hat' (pink) and 'Pukka Purple'. I used Pukka Purple and Bundle Monster stamping plate #BM-618 for the design. Oh, and a sprinkling of China Glaze 'Fairy Dust' was added to the gradient.

neon-radial-gradient-stamping
My left hand came out better than my right hand (even though I'm left handed...)

neon-radial-gradient-stamping
FYI my stamping is *meant* to be off-centre...

neon-radial-gradient-stamping
A bit blurry but look at the pretty Fairy Dust! <3

Hope you like them :)

Thanks for reading!

Helen x

Tuesday, 23 June 2015

Rockstar Gel Nails!

Hey everyone!

Today I want to share with you the sparkliest nails that my hands have ever adorned! 


gel-nails-rockstar-glitter-gradient
Rockstar Nails

This is a style nicknamed 'rockstar nails' and it is applied to a gel manicure.

The basic idea is:

  1. Clean and prep your nails for a gel manicure
  2. Apply a base coat and cure in an LED/UV lamp
  3. Apply a thin coat of gel polish and before curing sprinkle fine glitter onto the nail.
  4. Press lightly onto the nail to ensure the glitter adheres, then cure in your lamp.
  5. Apply topcoat and cure.

If you want to recreate this look, I recommend heading over to Chalkboard Nails for a great tutorial (the one that I followed), which has each step explained in much more detail than I gave above!


gel-nails-rockstar-glitter-gradient
Super glittery! 

gel-nails-rockstar-glitter-gradient
LOOK AT THE PRETTY!

This is so easy to create and the effect is absolutely stunning. As this is a gel manicure my nails are super glossy and the glitter really shines through, almost magnified by the topcoat.


gel-nails-rockstar-glitter-gradient
Obligatory macro shot :)

I used two Ciate glitters that I got in my Ciate Mini Manor Advent Calendar last year - a fantastic holographic silver ('Let It Snow') and holographic pink ('Prima Ballerina'). I have been waiting for the perfect opportunity to use these and I think I found it!


gel-nails-rockstar-glitter-gradient
My camera could only just pick up the holo goodness in these bottles


gel-nails-rockstar-glitter-gradient
Ciate Fine Holographic Glitter - Prima Ballerina and Let It Snow

gel-nails-rockstar-glitter-gradient
Can you see the holo shift?! 

I am starting to fall in love with gel manicures - there are so many possibilities using cured polish, and the prettiness lasts for ages too!

Thanks for reading!

Helen x

Sunday, 14 June 2015

Pink and Blue Half Moon Mani

Hi guys!

I am seriously loving blogging at the moment, so I thought I'd share with you a quick and simple manicure that I did recently.

blue-and-pink-half-moon-manicure
Half Moon Manicure
This is my second attempt at a half moon design (my first one you can see here, although be warned: this is in the early days of my nail art journey and it is absolutely pants!) 

For this one I used some nifty half moon nail vinyls from Sparkly Nails to create a clean shape. I highly recommend using stencils/vinyls for things like this as it keeps the manicure uniform across the nails, however I found that these particular vinyls left a sticky residue on my nails once I had peeled them off :( Luckily, my base coat is a white gel polish so I could easily remove the stickiness with acetone-free polish remover, although I think I would have had a problem if I had a regular polish as a base.


Half Moon Nail Vinyls -  from SparklyNails.co,uk

The colours used in this mani are from the Models Own Diamond Luxe collection; 'Asscher Blue' and 'Radiant Pink'. Models Own claim that these polishes 'contain real Diamond Dust to deliver a completely unique, multi-dimensional super-sparkly finish and some serious bling appeal'. There is a unique subtle shimmer to these shades (which you can see on the picture below), but I wouldn't say they are 'blingy'!


blue-and-pink-half-moon-manicure
Asscher Blue / Radiant Pink
Blue and pink nail art always makes me smile - it's so fun, pretty and girly. For a long time my only nail art consisted of Barry M blue and pink crackle polish - ah memories!


blue-and-pink-half-moon-manicure
I added the dots using Rimmel 'White Hot Love' and a dotting tool

blue-and-pink-half-moon-manicure

Hope you like it, thanks for reading!


Helen x

Pretty Purple Pattern Over Holo

Hi everyone!

I'm currently taking part in a Weekly Nail Art Challenge on Instagram and this weeks theme is holo + patterns

My original idea for this mani included a neon water marble, however after a devastating incident involving liquid latex and my carpet I have given up on watermarbling once again. I *will* succeed one day, but today is not that day (nor is tomorrow, probably!)

After my disaster, I decided to paint two layers of GOSH 'Holographic Hero' and stamped the tips using MoYou London Pro Plate #4 and my Hello Kitty polish 'Respect'. Respect is actually a dark blue shade, but it came out a deep purple when I stamped over the silver holo. It's a lovely and unexpected combination!

holographic-stamped-nails-wnac
Holographic Hero stamped with Respect using MoYou London Pro Plate #4

Unfortunately my camera just didn't want to demonstrate the holo-goodness of this polish no matter how hard I tried to capture it! You'll just have to believe me :)

holographic-stamped-nails-wnac
Obligatory (but blurry) macro shot

holographic-stamped-nails-wnac


Search the hashtag #wnac15 on Instagram to see all of the wonderful manicures other people have come up with as part of the challenge.

Thanks for reading!

Helen x

Wednesday, 10 June 2015

Monarch Butterfly Manicure

Hi everyone!

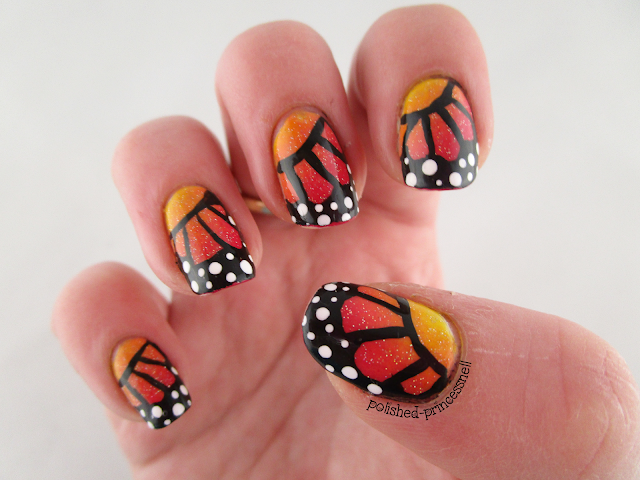
Today's manicure is inspired by the beauty of butterfly wings! Monarch (butterfly) nails are super popular in the nail world at the moment. I've never tried it before but it was surprisingly simple and the effect is stunning.

Here is the finished look:

nails-gradient-monarch-butterfly-wings
Monarch Butterfly Nails
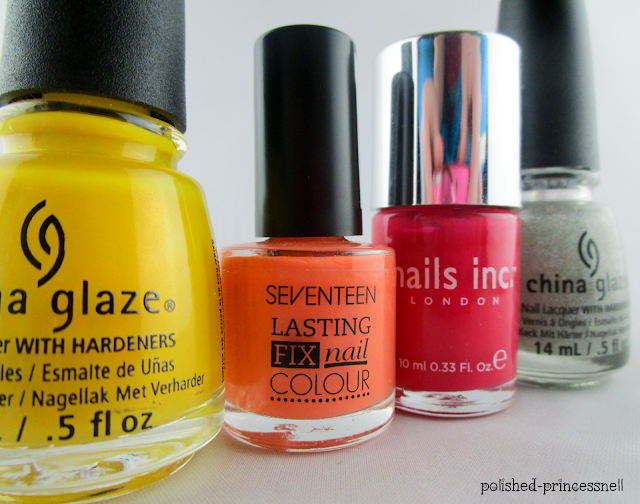
I wanted to keep with the colours of a typical monarch butterfly using a gradient of yellow through to deep pink (which is meant to be red, but I just can't resist pink!). I decided to use my new favourite yellow polish - China Glaze 'Sun's Up Top Down', along with Seventeen 'Orange Soda' and Nails Inc. 'Notting Hill Carnival'.  Of course nothing is quite complete without a sprinkling of China Glaze 'Fairy Dust'!


nails-gradient-monarch-butterfly-wings
L-R: Sun's Up Top Down / Orange Soda / Notting Hill Carnival / Fairy Dust
I began by creating a gradient from the corner of my nail, then added the detail using a small brush and black and white acrylic paint. Finally, I gave it a good coat of Glisten & Glow 'HK Girl', which is still in first place as my favourite quick-dry topcoat.


nails-gradient-monarch-butterfly-wings
How cool would it be if butterflies were sparkly in real life?!

nails-gradient-monarch-butterfly-wings
Monarch Butterfly Manicure

nails-gradient-monarch-butterfly-wings
Sparkly Gradient Monarch Butterfly Nails

 One day soon I *will* have the skills to make my striping neater and more consistent, but until them I'm still very happy with how these turned out :)

Thanks for reading!

Helen x

Monday, 4 May 2015

Fairy Dust and Framing

Hi lovelies!

Last weekend I bought my first ever bottle of China Glaze 'Fairy Dust' - I was so excited when I got home that I tested it out straight away. I haven't seen another glitter like it - the specks are so fine and yet super holograpic - it truly is a spectacular topper!

China Glaze - Fairy Dust

Not content with just Fairy Dust, I added extra sparkle to this mani with Nicole By OPI 'Awesome' as glitter placement around my nails, framing them.


Nicole By OPI - Awesome
I chose Barry M's 'Black' as my base, and added one layer of Fairy Dust over the top. Then, decanting Awesome onto a piece of paper, I picked up the glitter using a dotting tool and created a frame around each nail. I love how this turned out and was actually very quick and easy to do!


I topped this all off with two layers of Barry M 'Plumpy' to make it as smooth as possible, although the glitter did start peeling at the edges after about 12 hours. For someone who changes their manicure daily, this isn't so much of a problem, but if you want extra staying power on the glitter make sure to use a small amount of nail glue to keep them in place :)

Thanks for reading!

Helen x