Showing posts with label pink. Show all posts

Tuesday, 18 August 2015

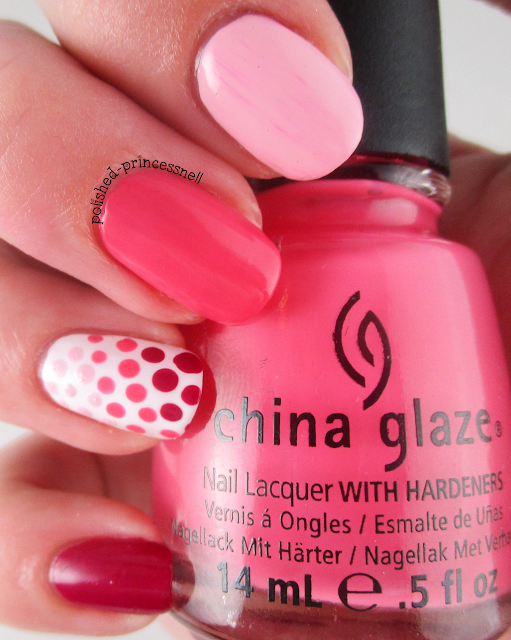
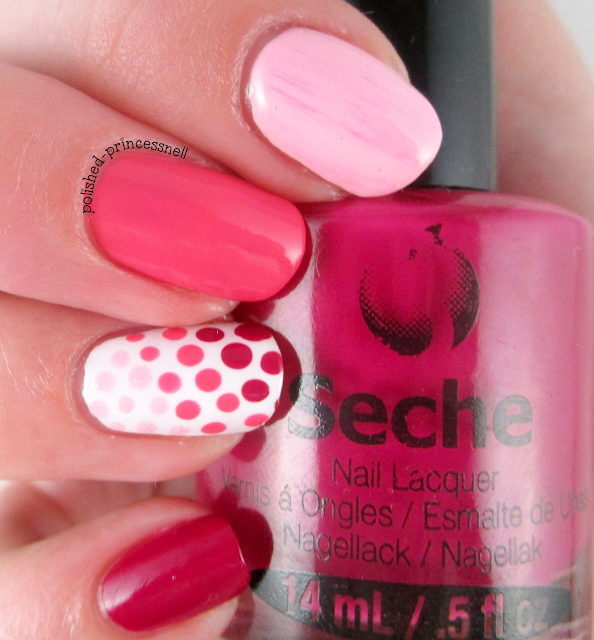
Pretty In Pink Nails

Hi guys,

Today I have some super simple and girly nails to show you. This was inspired by UK indie maker PolishedbyLeanne who is giving away her sparkly 'gemstone' polish collection to one lucky winner over on Instagram. And all you have to do is paint your nails pink! Pink is my favourite colour, and I definitely don't use it enough in my nail art, so I really enjoyed this manicure :)

pink-white-ombre-polka-dot-nails

The polishes I used here are Barry M 'Kiss Me Quick', China Glaze 'Sexy Lady', and Seche 'Opulant'. I also used my new fave one-coat white - Essence 'Wild White Ways'. As soon as I placed brush to nail I knew that this was a winner, and such a bargain purchase at only £1.60! I think I need to stock up on this polish as I'll be using it a lot! Unfortunately, my topcoat picked up some of the darker polish and spread it onto the pastel shade, leaving me with a dry-brush effect streak. Lesson learned: don't be so hasty!

pink-white-ombre-polka-dot-nails
Barry M - Kiss Me Quick
pink-white-ombre-polka-dot-nails
China Glaze - Sexy Lady
pink-white-ombre-polka-dot-nails
Seche - Opulant
For those who are interested in the progress of my stubby little thumb nail after it snapped halfway down about two weeks ago, take a peek at the pic below. Ugh, it still looks so silly! I think I'm going to be leaving her out of photos for a little while yet :(

pink-white-ombre-polka-dot-nails

pink-white-ombre-polka-dot-nails

pink-white-ombre-polka-dot-nails


Thanks for reading!

Helen x

Monday, 27 July 2015

Chameleon Thermal Gel Polish

Hi everyone!

Last week whilst I was away visiting family I tested out one of my newer purchases - a thermal gel polish from a brand called Aimeili. I know that the quality of gel polishes can be awful if you don't buy the right ones, but I find a price tag of £15+ a little too expensive for most regular gel shades. So I turned to Amazon for inspiration, and along came this polish for £4.49 and free delivery! I chose the shade named 'Hot Pink to Glitter White' which is product number TC04, however there are loads to choose from and I'll definitely be ordering more.

aimeili-thermal-chameleon-gel-polish-swatch

I applied this gel alongside Red Carpet 'Structure' basecoat, Red Carpet 'Brilliance' topcoat and Le Mini Macaron LED lamp. I have read conflicting reviews about mixing brands of gel polishes, but so far I have had no issue with this combination. This is by far the best gel manicure I have had in terms of durability and staying power! 

aimeili-thermal-chameleon-gel-polish-swatch

aimeili-thermal-chameleon-gel-polish-swatch

This gel is a gorgeous creamy-translucent white when it is warm, turning into a deep hot pink when cold. As my nails are at quite a long length at the moment, I found that I had a cute French manicure type effect going on most of the time. On shorter nails I imagine this wouldn't be quite so obvious, and the 'resting' colour would be more in line with the picture below.The white shade is not opaque (even with three layers), however it is still beautiful!

aimeili-thermal-chameleon-gel-polish-swatch

I am incredibly pleased with my purchase here and can't wait to try out more. I wore this manicure for one whole week (which is unheard of for me!) and I had absolutely no issues with chipping, dulling or general wear-and-tear. All of these photos were taken just before I removed the polish, so you can see just how great this one lasted.

aimeili-thermal-chameleon-gel-polish-swatch

What do you guys think? Have you tried out any of Aimeli's polishes before? Let me know in the comments!

Thanks for reading!

Helen x

Saturday, 4 July 2015

NEON WEEK: Strawberry and Lime!

Hi everyone!

I've got a quick post today to show you the mani I have been wearing over the last couple of days. For once I have kept it nice and simple and opted for block colours (neon, of course!), and a complimenting accent nail:

neon-pink-and-green-nails
Simple pink and green :)

This colour combination is super summery and reminds me of strawberries and limes! :) 

For this I used Models Own 'Sun Hat' and China Glaze 'Grass Is Lime Greener'. The accent nail is a base of OPI 'My Boyfriend Scales Walls' and a mix of two matte glitter toppers from Claire's: 'Junk' and 'Sea Green'. 

neon-pink-and-green-nails
L-R: Sea Green / Junk
neon-pink-and-green-nails

neon-pink-and-green-nails
Such pretty colours!

neon-pink-and-green-nails
I'd love a Twister ice lolly right now!

I hope you like these summery nails :)

Thanks for reading!

Helen x


Tuesday, 23 June 2015

Rockstar Gel Nails!

Hey everyone!

Today I want to share with you the sparkliest nails that my hands have ever adorned! 


gel-nails-rockstar-glitter-gradient
Rockstar Nails

This is a style nicknamed 'rockstar nails' and it is applied to a gel manicure.

The basic idea is:

  1. Clean and prep your nails for a gel manicure
  2. Apply a base coat and cure in an LED/UV lamp
  3. Apply a thin coat of gel polish and before curing sprinkle fine glitter onto the nail.
  4. Press lightly onto the nail to ensure the glitter adheres, then cure in your lamp.
  5. Apply topcoat and cure.

If you want to recreate this look, I recommend heading over to Chalkboard Nails for a great tutorial (the one that I followed), which has each step explained in much more detail than I gave above!


gel-nails-rockstar-glitter-gradient
Super glittery! 

gel-nails-rockstar-glitter-gradient
LOOK AT THE PRETTY!

This is so easy to create and the effect is absolutely stunning. As this is a gel manicure my nails are super glossy and the glitter really shines through, almost magnified by the topcoat.


gel-nails-rockstar-glitter-gradient
Obligatory macro shot :)

I used two Ciate glitters that I got in my Ciate Mini Manor Advent Calendar last year - a fantastic holographic silver ('Let It Snow') and holographic pink ('Prima Ballerina'). I have been waiting for the perfect opportunity to use these and I think I found it!


gel-nails-rockstar-glitter-gradient
My camera could only just pick up the holo goodness in these bottles


gel-nails-rockstar-glitter-gradient
Ciate Fine Holographic Glitter - Prima Ballerina and Let It Snow

gel-nails-rockstar-glitter-gradient
Can you see the holo shift?! 

I am starting to fall in love with gel manicures - there are so many possibilities using cured polish, and the prettiness lasts for ages too!

Thanks for reading!

Helen x

Sunday, 14 June 2015

Pink and Blue Half Moon Mani

Hi guys!

I am seriously loving blogging at the moment, so I thought I'd share with you a quick and simple manicure that I did recently.

blue-and-pink-half-moon-manicure
Half Moon Manicure
This is my second attempt at a half moon design (my first one you can see here, although be warned: this is in the early days of my nail art journey and it is absolutely pants!) 

For this one I used some nifty half moon nail vinyls from Sparkly Nails to create a clean shape. I highly recommend using stencils/vinyls for things like this as it keeps the manicure uniform across the nails, however I found that these particular vinyls left a sticky residue on my nails once I had peeled them off :( Luckily, my base coat is a white gel polish so I could easily remove the stickiness with acetone-free polish remover, although I think I would have had a problem if I had a regular polish as a base.


Half Moon Nail Vinyls -  from SparklyNails.co,uk

The colours used in this mani are from the Models Own Diamond Luxe collection; 'Asscher Blue' and 'Radiant Pink'. Models Own claim that these polishes 'contain real Diamond Dust to deliver a completely unique, multi-dimensional super-sparkly finish and some serious bling appeal'. There is a unique subtle shimmer to these shades (which you can see on the picture below), but I wouldn't say they are 'blingy'!


blue-and-pink-half-moon-manicure
Asscher Blue / Radiant Pink
Blue and pink nail art always makes me smile - it's so fun, pretty and girly. For a long time my only nail art consisted of Barry M blue and pink crackle polish - ah memories!


blue-and-pink-half-moon-manicure
I added the dots using Rimmel 'White Hot Love' and a dotting tool

blue-and-pink-half-moon-manicure

Hope you like it, thanks for reading!


Helen x

Sunday, 3 May 2015

Le Mini Macaron - Gel Manicure Kit For 'Girls On The Go!'

Hi guys!

Today I have something very exciting to share with you, something I have been waiting to get my hands on for a while, and something that is just too damn cute to miss out on!


Le Mini Macaron!

Back in January, I funded a campaign on Kickstarter for Le Mini Macaron, which claims to be:

"Adorable, affordable gel manicure kits for girls on-the-go! Inspired by the French macaron concept…colorful, flavorful and fun!"


Having never tried a gel manicure before, I was a little apprehensive to go all-out on an at-home DIY gel mani kit. However, I discovered Le Mini Macaron on Instagram, and happily gave my $30 to help the project. For the price of a gel mani in a salon, I was getting my own (really cute) kit and a pretty pink polish too! Bargain! In February the project was fully backed and so Le Mini Macaron went into production. I was thrilled to receive my kit in the post on Saturday morning, and eagerly tested it out!

The box contains an LED lamp, USB cable, cuticle pusher, one bottle of gel polish and ten gel removing sachets. The LED lamp is only big enough for one finger (or toe) at a time, but it cures in 30 seconds, making it a speedy alternative to the traditional manicure.


Credit: Le Mini Macaron

As this is a 'one-step' gel application process, no special topcoats or basecoats are needed to complete your manicure. The instructions state to apply one thin layer of polish, cure, and then apply your thicker, final polish coat and cure again. I found that I required three thin coats, but this is down to personal preference - two was definitely opaque enough. 


Look at the pretty!!

The colour of the pink polish in my kit (named 'Strawberry Pink') is a pretty, girly pink, and slightly brighter than I was expecting (other colours are available). Application was easy with both coats self-levelling well. After curing for a total of 60 seconds each, my nails were completely dry and boasted a lovely shine and solid finish. I am very, very impressed!

The lamp is adorable, and so light and portable. It holds a 3 Watt LED bulb that cures each coat of gel in just 30 seconds. In order to power the lamp, you connect it to your PC via USB, meaning you can do your nails anywhere! The kit also comes with a wall charger, although this will require a converter for anyone outside of the USA.

The lamp

After applying your polish, simply pop your finger into the lamp and press the power button on top. This will charge the lamp for 30 seconds, allowing the polish to harden.


Le Mini Macaron power switch


One thing I absolutely LOVE about Le Mini Macaron is the secure magnetic top that the lamp has, With a quick twist you can flip the lid around to allow you to cure your tootsies too!


It's easy peasy to pedi! 
Magnets 'clip' the lid to the base

I just love the design of this thing. I can see myself using this all the time - especially when travelling. It is perfect for taking on holiday as it is so compact and quick to achieve fantastic results. I have also tested the lamp out with other 'one-step' gel polishes (such as Fuse), and the results are just as good.

Le Mini Macaron

Inside the lamp

I think this has to be one of the best nail product purchases I have made in a while. It really is the perfect solution for those who want gel manicures at home without any fuss. Le Mini Macaron also have other gorgeous colours available in both lamps and gel polishes, so it is definitely worth checking out their website here. Le Mini Macaron is quickly becoming my new favourite thing! :)

I am sure I will be using this not only as a long-lasting manicure, but also as a base for nail art (as gel polishes are not removed by non-acetone removers).

Thanks for reading!

Helen x


Saturday, 25 April 2015

Mani Swap - Stripey Nails with Pink Rose Accents

Hi everyone!

It's been such a busy couple of weeks as I've started a new job and I'm finally getting my life on track again, I've not had a chance to sit down and write a proper post. But now it's the weekend I get to catch up on the fun stuff, like painting nails and writing about it! :)

Today I have a manicure that I created in a recent mani swap with Alyssa (The Girly Engineer on Instagram). It's a beautiful and delicate design, integrating chic pastel stripes with vintage style roses. Very cute! Alyssa decided to try out my sugar skull mani that I created a little while ago (blog post here), and she did an awesome job!

Mani Swap with Alyssa AKA @thegirlyengineer
My nails are on the left, Alyssa's nails are on the right

For this design I decided to use quite muted colours, as I wanted this to be as delicate as possible, I chose the gorgeous Rimmel 'Rose Libertine', (a lovely dusty pink) and Barry M 'Kiss Me Quick' for the roses, with Essie 'Mint Candy Apple' leaves. My base was Barry M 'Coconut' and Rimmel 'Breakfast In Bed'.

L-R: Rose Libertine / Kiss Me Quick / Coconut / Mint Candy Apple / Breakfast In Bed

I just want to take a moment to talk about my base colour - Barry M's amazing Coconut. This is a shade I've been wanting to get my hands on for a while. It is the perfect base for nail art as it is creamy off-white (almost nude), so it doesn't have the harsh starkness that some white polishes have. It is up there with OPI 'My Vampire Is Buff' as my favourite nude-ish base, but at only £3.99 a bottle it's an absolute steal compared to brands such as OPI! Here is a photo of Coconut on it's own:

Barry M Coconut, available in Boots and Superdrug for £3.99

The final product!

This was my first attempt at roses, so they are a bit 'blobby' and don't have the detail that I would have wanted, but I'll definitely try the technique again. Overall I'm happy with the outcome, and it was so much fun finally being able to do a mani swap, I'm hoping there'll be many more in the future!

Thanks for reading!

Helen x

Tuesday, 14 April 2015

Pretty In Pink

Hi guys!

I have a lovely simple manicure today using only two (yes, two!) colours and a sprinkle of gems. I recently ordered some Seche nail polish, hoping that they would live up to the reputation that Seche Vite topcoat has instilled into the brand. Although I haven't yet swatched these polishes properly, I thought that the below pink was perfect for the kind of mani I wanted to create tonight.

OPI 'My Boyfriend Scales Walls' and Seche 'Precious'
'My Boyfriend Scales Walls' by OPI is one of my favourite white polishes. It's not a true white and has an ever so slight grey undertone to it, making wearing it easy as it's not too stark. It matches beautifully with Seche 'Precious', which is a sheer pink with subtle lilac-silver shimmer. Gorgeous! Although the application isn't great (I found it quite thin in consistency) I managed to get a great colour using three coats.

Sorry for the blurry pic! Pinkie - Precious / Ring - My Boyfriend Scales Walls
The finished look
 I was super annoyed to have smudged my middle finger just before taking photos, but at three layers for coverage I didn't have time to re-do the nail!

Finally, can we all just take a moment to truly appreciate the fabulousness that is my new phonecase:

It is soooooo pretty! Video is on my Instagram page!

Sorry for such a short post today - I started a new job this week and I've not had time to blog, but that should change soon =) Hope you liked the nails!

Thanks for reading!

Helen x

Wednesday, 8 April 2015

Scaled Gradient - First Attempt

Hello my lovelies!

It's been a manic few days lately as I've been participating in a nail art challenge held on Instagram (you can check out my entries on Instagram by clicking the link at the side of this page -->) 


Blurry picture! Scaled gradient using chevron nail vinyls.
The prompt for 7th April is 'ombre/gradient', so I decided to try out a scaled gradient; something I've never attempted before. A scaled gradient is basically two gradients on the nail, one at the bottom and one further up the nail towards the tip. I used chevron nail vinyls from sparkly-nails.co.uk to create the barrier between the two gradients. Simply 
Nailogical has an amazing post here which explains everything you could possibly need to know about gradients. I cannot recommend this article enough, as a matter of fact, it was Cristine from Simply Nailogical who first came up with the scaled gradient idea (and many others!) Definitely check out her blog if you are in need  of any gradient-related nail porn!


I ensured that I picked polishes that would have enough opacity to cover the other polishes. For example, my light blue needed to be pigmented enough to cover the darker blue at the scaled part of the gradient. I went through my stash and chose Barry M 'Blue Grape', Seche 'Casually Cool', Seche 'Snapdragon' and Essie 'Flawless'.

L-R: Blue Grape / Casually Cool / Snapdragon / Flawless

Anyway, here are the nails:


Unfortunately my pinkie finger is too small and so I struggled to fit two gradients on the tiny canvas, so I decided to cover it all with glitter! My fave glitter collection is Barry M's 'Glitterati' which is an outstanding set of six polishes (go and buy them NOW!). For this I used 'VIP' to cover up my mess.


VIP from the Glitterati Collection

The final product! (Please ignore hair dangling from middle finger...)

Let me know what you think!

Thanks for reading,

Helen x