Showing posts with label barry m. Show all posts

Monday, 19 October 2015

An Autumnal Gradient

Hi guys!

It's been so long since I posted here and I actually feel really guilty about it! I'm hoping to get into a regular posting pattern again soon as I have so many manis to share with you :)

Today I'm going to show you an autumn inspired gradient that I created recently:

autumn-gradient-nail-art

This time last year I picked up the Barry M 2014 A/W collection, which I'm ashamed to say have not been put to any use until now. I really wanted a warm and cozy manicure and think that these colours give that effect perfectly! This is 'Cocoa', 'Paprika' and 'Mustard' used in a sponged gradient. They remind me of leather, especially with the addition of the little gold studs!

autumn-gradient-nail-art
Leaf or feather? You decide!

My accent nail is what I'm going to call a 'feaf' - a leaf/feather hybrid! My boyfriend says it is obviously a feather, however Kelly from @purrfect_nails says it is obviously a leaf. If I'm honest I wasn't sure what I was creating at the time, so it's open to interpretation! 

autumn-gradient-nail-art

autumn-gradient-nail-art

Although this is nothing like my usual style I actually really like how it looks. I want to start moving away from my 'comfortable' colours (e.g. pink) and start using some of my less used shades (brown, anyone?!) Watch this space!

Thanks for reading!

Helen x

Friday, 4 September 2015

31 Day Challenge - Day 2 - Orange

Hi guys!

This is a super quick post featuring my second mani in the 31 Day Challenge. Prompt number two is 'orange' so I decided to stamp a tiger design onto my nails :D


#31dc2015-day-two-orange-nails

For this design I used Bundle Monster plate #613 from the CYO 2014 collection. For the base I dry brushed  NYC 'Summer In NYC', an unnamed Ted Baker peach shimmer polish, Barry M 'Cocoa' and Barry M 'Coconut' onto my nail, then stamped directly onto the nail using MoYou London 'Black Knight' stamping polish.

Sorry for the short post, I've been feeling under the weather this week and haven't been able to put as much time into nails and blogging as I usually would. Stick with me, guys!

Thanks for reading!

Helen x 

P.S. Check out all of the other submissions for the 31 Day Challenge over on Instagram - just search the hashtag #31DC2015 :)

Monday, 24 August 2015

Green Leaves Nail Art

Hey!

Today's nails are inspired by nature. And sparkly charms!

leaves-tree-nail-art

I've been dying to use this adorable leaf charm for a while, so when I saw a manicure by @charsnails on Instagram using it, I just had to paint my nails! 

leaves-tree-nail-art

I started with a base of Nails Inc. 'Marylebone Road' on all fingers except my ring finger, which I painted using Barry M 'Cardamom' (as a background for my charm). I then used the saran-wrap technique to blend 'Cardamom', 'Marylebone Road', and Make Up Gallery 'Spearmint' on the nail. The final step was to create a leaf pattern using acrylic paint, stick on my charm and top with Poshe Topcoat. Et voila!

leaves-tree-nail-art

leaves-tree-nail-art

These turned out much better than I imagined they would, and I really love the effect of the leaves. As a result of this mani, I now have loads of ideas for nature-themed nails that I can't wait to try out!

leaves-tree-nail-art

Thanks for reading!

Helen x

Tuesday, 18 August 2015

Pretty In Pink Nails

Hi guys,

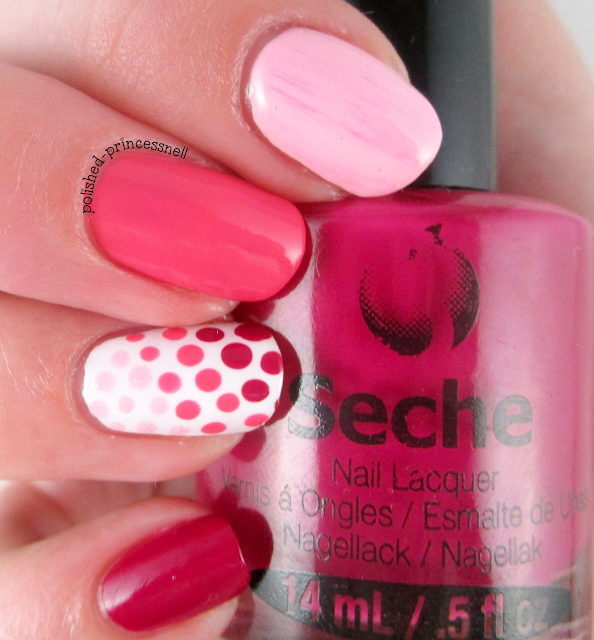
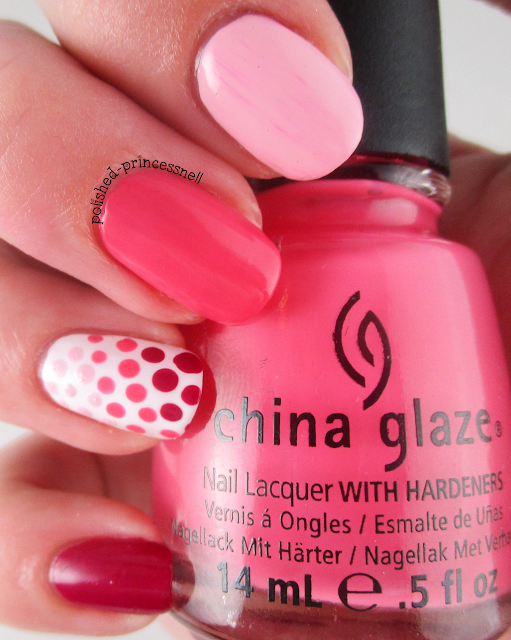
Today I have some super simple and girly nails to show you. This was inspired by UK indie maker PolishedbyLeanne who is giving away her sparkly 'gemstone' polish collection to one lucky winner over on Instagram. And all you have to do is paint your nails pink! Pink is my favourite colour, and I definitely don't use it enough in my nail art, so I really enjoyed this manicure :)

pink-white-ombre-polka-dot-nails

The polishes I used here are Barry M 'Kiss Me Quick', China Glaze 'Sexy Lady', and Seche 'Opulant'. I also used my new fave one-coat white - Essence 'Wild White Ways'. As soon as I placed brush to nail I knew that this was a winner, and such a bargain purchase at only £1.60! I think I need to stock up on this polish as I'll be using it a lot! Unfortunately, my topcoat picked up some of the darker polish and spread it onto the pastel shade, leaving me with a dry-brush effect streak. Lesson learned: don't be so hasty!

pink-white-ombre-polka-dot-nails
Barry M - Kiss Me Quick
pink-white-ombre-polka-dot-nails
China Glaze - Sexy Lady
pink-white-ombre-polka-dot-nails
Seche - Opulant
For those who are interested in the progress of my stubby little thumb nail after it snapped halfway down about two weeks ago, take a peek at the pic below. Ugh, it still looks so silly! I think I'm going to be leaving her out of photos for a little while yet :(

pink-white-ombre-polka-dot-nails

pink-white-ombre-polka-dot-nails

pink-white-ombre-polka-dot-nails


Thanks for reading!

Helen x

Friday, 7 August 2015

Cute Checkered Floral Mani

Hi everyone!

Today I have a checkered design with floral accents to show you. I have been wanting to do something like this for a while, and the finished look reminds me of curtains or towels that you might have in your kitchen! Very summery and cute!

checkered-floral-nail-art

For this manicure I started with a base of Barry M 'Coconut' which is the most perfect milky off-white colour <3. Once dry, I placed striping tape in a checkered pattern on my nails and topped with Barry M 'Sky Blue' on my thumb, index and pinkie fingers, then Collection 'Peach Blossom' on my middle and ring fingers. For the floral design, I blended 'Sky Blue' and 'Damson' (by Barry M) on the nail, and finished with Ciate 'Mojito' for the leaves.

checkered-floral-nail-art

I'm pretty pleased with how these came out and want to try a similar design with more of a yellow theme as I have a very particular set of kitchen curtains in mind which this doesn't quite capture!

checkered-floral-nail-art

checkered-floral-nail-art

checkered-floral-nail-art

Hope you like them :)

Thanks for reading!

Helen

Friday, 10 July 2015

Lace Stamped Nails

Hi guys!

Wow, two blog posts in one day! I'm on a roll :)

Today's manicure is one that I've been waiting to try out for a long time - lace nails! I finally ordered myself a lace design stamping plate from BornPrettyStore.com, and couldn't wait to use it in some nail art!


lace-stamped-nail-art

For this manicure I used a new Barry M Speedy Quick-Dry polish from their summer release - 'Lap Of Honour'. I painted my thumb, index and middle finger with this then stamped over it using Color Club 'French Tip' polish. On my ring finger I added a base of OPI 'My Boyfriend Scales Walls', then stamped with Claire's 'Liquid Metal Rose Gold'. Finally, I covered my pinkie with a gorgeous glitter polish from Maybelline called 'Gilded Rose'.


lace-stamped-nail-art

I couldn't resist sticking a few gems onto the nail as a finishing touch!


lace-stamped-nail-art

This manicure is way more delicate than I would normally wear, but I got a lot of compliments on it and love the detail in the stamp. I hadn't tried out any of the Born Pretty Store stamping plates before, but I must say I am impressed with the quality. The lines are well defined and create a clear image on the stamp and on the nail. For only £2.50 you really can't complain. Free shipping too! Enter my code CESH10 for 10% off your order at BornPrettyStore.com :)

Thanks for reading!

Helen x

Monday, 4 May 2015

Fairy Dust and Framing

Hi lovelies!

Last weekend I bought my first ever bottle of China Glaze 'Fairy Dust' - I was so excited when I got home that I tested it out straight away. I haven't seen another glitter like it - the specks are so fine and yet super holograpic - it truly is a spectacular topper!

China Glaze - Fairy Dust

Not content with just Fairy Dust, I added extra sparkle to this mani with Nicole By OPI 'Awesome' as glitter placement around my nails, framing them.


Nicole By OPI - Awesome
I chose Barry M's 'Black' as my base, and added one layer of Fairy Dust over the top. Then, decanting Awesome onto a piece of paper, I picked up the glitter using a dotting tool and created a frame around each nail. I love how this turned out and was actually very quick and easy to do!


I topped this all off with two layers of Barry M 'Plumpy' to make it as smooth as possible, although the glitter did start peeling at the edges after about 12 hours. For someone who changes their manicure daily, this isn't so much of a problem, but if you want extra staying power on the glitter make sure to use a small amount of nail glue to keep them in place :)

Thanks for reading!

Helen x


Saturday, 25 April 2015

Mani Swap - Stripey Nails with Pink Rose Accents

Hi everyone!

It's been such a busy couple of weeks as I've started a new job and I'm finally getting my life on track again, I've not had a chance to sit down and write a proper post. But now it's the weekend I get to catch up on the fun stuff, like painting nails and writing about it! :)

Today I have a manicure that I created in a recent mani swap with Alyssa (The Girly Engineer on Instagram). It's a beautiful and delicate design, integrating chic pastel stripes with vintage style roses. Very cute! Alyssa decided to try out my sugar skull mani that I created a little while ago (blog post here), and she did an awesome job!

Mani Swap with Alyssa AKA @thegirlyengineer
My nails are on the left, Alyssa's nails are on the right

For this design I decided to use quite muted colours, as I wanted this to be as delicate as possible, I chose the gorgeous Rimmel 'Rose Libertine', (a lovely dusty pink) and Barry M 'Kiss Me Quick' for the roses, with Essie 'Mint Candy Apple' leaves. My base was Barry M 'Coconut' and Rimmel 'Breakfast In Bed'.

L-R: Rose Libertine / Kiss Me Quick / Coconut / Mint Candy Apple / Breakfast In Bed

I just want to take a moment to talk about my base colour - Barry M's amazing Coconut. This is a shade I've been wanting to get my hands on for a while. It is the perfect base for nail art as it is creamy off-white (almost nude), so it doesn't have the harsh starkness that some white polishes have. It is up there with OPI 'My Vampire Is Buff' as my favourite nude-ish base, but at only £3.99 a bottle it's an absolute steal compared to brands such as OPI! Here is a photo of Coconut on it's own:

Barry M Coconut, available in Boots and Superdrug for £3.99

The final product!

This was my first attempt at roses, so they are a bit 'blobby' and don't have the detail that I would have wanted, but I'll definitely try the technique again. Overall I'm happy with the outcome, and it was so much fun finally being able to do a mani swap, I'm hoping there'll be many more in the future!

Thanks for reading!

Helen x
Wednesday, 8 April 2015

Scaled Gradient - First Attempt

Hello my lovelies!

It's been a manic few days lately as I've been participating in a nail art challenge held on Instagram (you can check out my entries on Instagram by clicking the link at the side of this page -->) 


Blurry picture! Scaled gradient using chevron nail vinyls.
The prompt for 7th April is 'ombre/gradient', so I decided to try out a scaled gradient; something I've never attempted before. A scaled gradient is basically two gradients on the nail, one at the bottom and one further up the nail towards the tip. I used chevron nail vinyls from sparkly-nails.co.uk to create the barrier between the two gradients. Simply 
Nailogical has an amazing post here which explains everything you could possibly need to know about gradients. I cannot recommend this article enough, as a matter of fact, it was Cristine from Simply Nailogical who first came up with the scaled gradient idea (and many others!) Definitely check out her blog if you are in need  of any gradient-related nail porn!


I ensured that I picked polishes that would have enough opacity to cover the other polishes. For example, my light blue needed to be pigmented enough to cover the darker blue at the scaled part of the gradient. I went through my stash and chose Barry M 'Blue Grape', Seche 'Casually Cool', Seche 'Snapdragon' and Essie 'Flawless'.

L-R: Blue Grape / Casually Cool / Snapdragon / Flawless

Anyway, here are the nails:


Unfortunately my pinkie finger is too small and so I struggled to fit two gradients on the tiny canvas, so I decided to cover it all with glitter! My fave glitter collection is Barry M's 'Glitterati' which is an outstanding set of six polishes (go and buy them NOW!). For this I used 'VIP' to cover up my mess.


VIP from the Glitterati Collection

The final product! (Please ignore hair dangling from middle finger...)

Let me know what you think!

Thanks for reading,

Helen x

Friday, 3 April 2015

Stamping Over Ombré Nails - MoYou London Princess Collection

Hello lovelies!

After a busy few days of visiting family 300 miles away I am now back to the lovely city of Bristol and have been working on a pretty little ombré manicure for you all, stamped over with MoYou Princess collection plate #10. I've been wanting to do something like this for a while and my nails are now long enough for it to be worthwhile!

I wanted this to be very feminine and pretty, so I chose some cute pinks to make my ombré with - Rimmel 'Rose Libertine', Essie 'Flawless', and Rimmel 'Lose Your Lingerie'. I prepped my nails before sponging with Barry M 'Matt White' to ensure that my pinks were bright enough on the nail. 

L-R: Rose Libertine / Flawless / Lose Your Lingerie / Matt White


I think this is actually my first ombré (different tones of the same colour hue), as I usually do gradients (different colours blended together). I absolutely love how the ombré turned out, and couldn't resist snapping a few pics before I stamped all over it! 

My first attempt at ombré nails

I recently picked up my MoYou London Princess set from Boots (available to buy online here), and hadn't tried it out. I love the branding that MoYou London have - it reminds me slightly of Soap and Glory (also available from Boots)! The Princess Collection is really sweet, and includes lots of cutesy designs from hearts and flowers to raindrops and bunnies! It's adorable!

I used plate number 10 and I have circled the particular image below. I chose two designs from the plate - interlocking love hearts and butterflies, alternating on each nail. Stamping in white allowed the patterns to 'fade' into the lighter part of the ombré.

MoYou London Princess Collection

Stamped using MoYou London Princess plate #10

My cuticles are in awful shape at the moment, so I apologise for the raggedy dryness. I'm using extra amounts of my favourite cuticle rescue treatment Lemony Flutter Cuticle Butter which is available from Lush here. It smells amazing and you can feel the goodness seeping into your nails and cuticles when you apply it. If you haven't tried it I highly recommend you do!

I love this mani and hope that I continue to improve my stamping so I can really start incorporating the technique into other nail designs.

Thanks for reading!

Helen x

Sunday, 29 March 2015

Inspired By Underwear...

Hello lovelies!

Today's mani is inspired by one of my favourite underwear sets. Hey, we can't help what inspires us, right?! This little set is made by Freya and it is just so pretty - I love the mix of colours and thought they would translate nicely onto my nails! .You can buy the set here.


I had a good flick through my swatch book to find colours that matched as closely as possible, which I think I succeeded in! For this design I used Ciate 'Mojito', Barry M 'Dragon Fruit', Nicole by OPI 'I Can Teal You Like Me', and China Glaze 'I Sea The Point'. I was worried that the pink and lime green polishes would struggle to cover the dark blue base, but luckily they are pigment heavy polishes so I didn't have any troubles! I topped it off with my all time favourite topcoat HK Girl by Glisten & Glow.


L-R: I Can Teal You Like Me / Mojito / Dragon Fruit / I Sea The Point

I'm not too happy with the brush strokes on this, especially on my ring finger, but it's all practice! If anyone has any advice on brush techniques please do pass it on to me - I'd be very grateful!


Inspired by my pants! :)

Overall I'm pretty pleased with these ones, even though it's a little on the messy side, I love the colours and the fact that I can match my underwear to my nails makes me happy!

Thanks for reading!

Helen x