Showing posts with label seche. Show all posts

Tuesday, 18 August 2015

Pretty In Pink Nails

Hi guys,

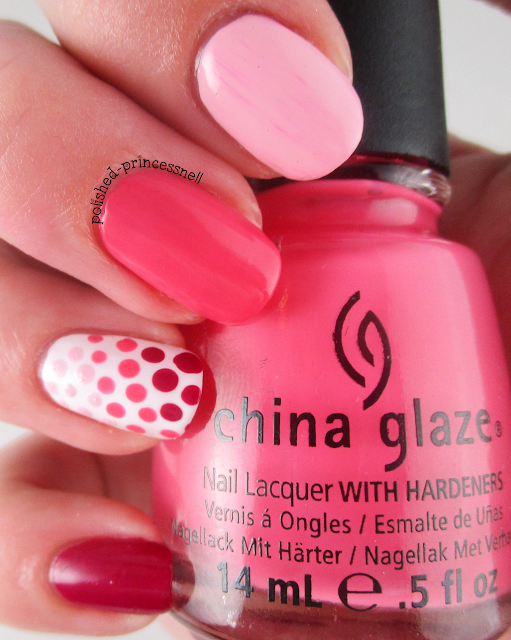
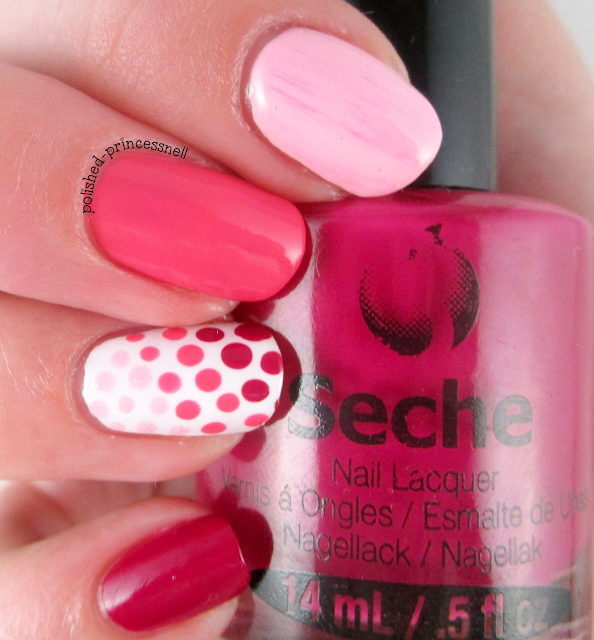
Today I have some super simple and girly nails to show you. This was inspired by UK indie maker PolishedbyLeanne who is giving away her sparkly 'gemstone' polish collection to one lucky winner over on Instagram. And all you have to do is paint your nails pink! Pink is my favourite colour, and I definitely don't use it enough in my nail art, so I really enjoyed this manicure :)

pink-white-ombre-polka-dot-nails

The polishes I used here are Barry M 'Kiss Me Quick', China Glaze 'Sexy Lady', and Seche 'Opulant'. I also used my new fave one-coat white - Essence 'Wild White Ways'. As soon as I placed brush to nail I knew that this was a winner, and such a bargain purchase at only £1.60! I think I need to stock up on this polish as I'll be using it a lot! Unfortunately, my topcoat picked up some of the darker polish and spread it onto the pastel shade, leaving me with a dry-brush effect streak. Lesson learned: don't be so hasty!

pink-white-ombre-polka-dot-nails
Barry M - Kiss Me Quick
pink-white-ombre-polka-dot-nails
China Glaze - Sexy Lady
pink-white-ombre-polka-dot-nails
Seche - Opulant
For those who are interested in the progress of my stubby little thumb nail after it snapped halfway down about two weeks ago, take a peek at the pic below. Ugh, it still looks so silly! I think I'm going to be leaving her out of photos for a little while yet :(

pink-white-ombre-polka-dot-nails

pink-white-ombre-polka-dot-nails

pink-white-ombre-polka-dot-nails


Thanks for reading!

Helen x

Tuesday, 14 April 2015

Pretty In Pink

Hi guys!

I have a lovely simple manicure today using only two (yes, two!) colours and a sprinkle of gems. I recently ordered some Seche nail polish, hoping that they would live up to the reputation that Seche Vite topcoat has instilled into the brand. Although I haven't yet swatched these polishes properly, I thought that the below pink was perfect for the kind of mani I wanted to create tonight.

OPI 'My Boyfriend Scales Walls' and Seche 'Precious'
'My Boyfriend Scales Walls' by OPI is one of my favourite white polishes. It's not a true white and has an ever so slight grey undertone to it, making wearing it easy as it's not too stark. It matches beautifully with Seche 'Precious', which is a sheer pink with subtle lilac-silver shimmer. Gorgeous! Although the application isn't great (I found it quite thin in consistency) I managed to get a great colour using three coats.

Sorry for the blurry pic! Pinkie - Precious / Ring - My Boyfriend Scales Walls
The finished look
 I was super annoyed to have smudged my middle finger just before taking photos, but at three layers for coverage I didn't have time to re-do the nail!

Finally, can we all just take a moment to truly appreciate the fabulousness that is my new phonecase:

It is soooooo pretty! Video is on my Instagram page!

Sorry for such a short post today - I started a new job this week and I've not had time to blog, but that should change soon =) Hope you liked the nails!

Thanks for reading!

Helen x

Saturday, 11 April 2015

Rockstud Nails! Inspired by Valentino

Hello lovely people!

When I was 14 I received a Valentino perfume for Christmas. I remember being totally won over by the packaging, lots of bright colours and a crisp-looking cubed bottle. I cannot for the life of me find an image of the particular perfume online, which is a total disappointment, but I can assure you it was gorgeous! Recently I stumbled upon Valentino's new Rockstud Collection on Instagram, and again I'm totally won over - I love the contrast of bright colours with hints of gold accent coming from the studs which adorn each item. At approximately £1500, I'm not going to be able to afford/justify buying a Valentino bag, but the design is perfect to translate onto nails!

Valentino - Rockstud Collection

As always, I flicked through my swatch book to find the most suitable colours, and ended up using: Ciate 'Mojito', Rimmel 'Raw As Night', Rimmel 'Black Cherries', Sally Hansen 'Butter-fly Stroke', Seche 'Snapdragon',  and Nails Inc. 'Kensington Park Road'.


L-R: Mojito / Raw As Night / Black Cherries / Butter-fly Stroke / Snapdragon / Kensington Park Road

I completed the whole design freehand - no striping tape, no vinyls, no template at all - which I am very proud of, particularly my index and pinkie fingers! I added studs to every nail to keep in theme (any excuse to stick things to my nails!) 

Valentino Inspired Nails
I absolutely love wearing these, they are so bright and cheerful and totally me. I want to replicate this again in a few months to see if I can improve on my 'V' shapes, but I am absolutely happy with this as a first attempt.

Here are a few more photos:


And here is a final shot of both hands. I definitely think that I am getting better using my non-dominant hand for freehand designs, and I sometimes find that my left hand is actually better than my right. Maybe it's because I'm concentrating more? 


I hope you like these as much as I do. As always I'd LOVE to hear what you think, so please feel free to comment below or leave a message on my Facebook page!

Thanks for reading!

Helen x

PS If anyone would like to buy me a Valentino bag, I will wholeheartedly accept! :)

Wednesday, 8 April 2015

Scaled Gradient - First Attempt

Hello my lovelies!

It's been a manic few days lately as I've been participating in a nail art challenge held on Instagram (you can check out my entries on Instagram by clicking the link at the side of this page -->) 


Blurry picture! Scaled gradient using chevron nail vinyls.
The prompt for 7th April is 'ombre/gradient', so I decided to try out a scaled gradient; something I've never attempted before. A scaled gradient is basically two gradients on the nail, one at the bottom and one further up the nail towards the tip. I used chevron nail vinyls from sparkly-nails.co.uk to create the barrier between the two gradients. Simply 
Nailogical has an amazing post here which explains everything you could possibly need to know about gradients. I cannot recommend this article enough, as a matter of fact, it was Cristine from Simply Nailogical who first came up with the scaled gradient idea (and many others!) Definitely check out her blog if you are in need  of any gradient-related nail porn!


I ensured that I picked polishes that would have enough opacity to cover the other polishes. For example, my light blue needed to be pigmented enough to cover the darker blue at the scaled part of the gradient. I went through my stash and chose Barry M 'Blue Grape', Seche 'Casually Cool', Seche 'Snapdragon' and Essie 'Flawless'.

L-R: Blue Grape / Casually Cool / Snapdragon / Flawless

Anyway, here are the nails:


Unfortunately my pinkie finger is too small and so I struggled to fit two gradients on the tiny canvas, so I decided to cover it all with glitter! My fave glitter collection is Barry M's 'Glitterati' which is an outstanding set of six polishes (go and buy them NOW!). For this I used 'VIP' to cover up my mess.


VIP from the Glitterati Collection

The final product! (Please ignore hair dangling from middle finger...)

Let me know what you think!

Thanks for reading,

Helen x