Showing posts with label freehand. Show all posts

Monday, 13 July 2015

Nautical Nails

Hello!

I am very proud of the mani I am showing you today, and I actually think it might be the 'neatest' design that I have created so far! Except for when I added topcoat and smudged it all. Oh well! Here are the nails:
nautical-nail-design


My base for this is Red Carpet Manicure white gel polish. I like to choose a gel base when I know I will be attempting a design that may need a few changes or nails that need completely redoing due to my mistakes. With gel you just wipe away the mistake with acetone-free polish remover and start over!

The red polish I used is OPI 'Cinnamon Sweet', and the blue is Rimmel 'Blue Eyed Girl'. I particularly like the red in this design as it's not a bright 'pillar-box' red or pink toned - I think it's perfectly nautical!


nautical-nail-design

nautical-nail-design

I freehanded the little anchor on my index finger with Models Own 'Gold Chrome' and topped it with Ciate 'Ladylike Luxe'.


nautical-nail-design

nautical-nail-design

I used mini gold discs that I bought in a gem wheel from Poundland to add accents to each nail.


nautical-nail-design

nautical-nail-design

I absolutely love these nails, and hope you do too!

Thanks for reading!

Helen x

Friday, 10 July 2015

NEON WEEK: Aztec Nails

Hi everyone!

As part of my neon week, I wanted to incorporate an Aztec/tribal pattern into one of my designs. I recently picked up a Color Club Nail Striper in black, and thought this might be a good way to test it out.

neon-aztec-tribal-nail-art
Neon Tribal Nail Art

For this manicure I used a base of MoYou London 'White Knight', then divided the nails with Models Own 'Shades' from their Polish For Tans collection (I LOVE those polishes!). Finally, I added the detail using a teeny-tiny dotting tool and my Color Club striper.

neon-aztec-tribal-nail-art

neon-aztec-tribal-nail-art

neon-aztec-tribal-nail-art

Overall I'm pleased with how these turned out. I definitely need to practice my freehand linework with my striper, though!

neon-aztec-tribal-nail-art
I love the contrast between the pop of colour and the black and white design. 

Thanks for reading!

Helen x

Sunday, 28 June 2015

NEON WEEK: Leopard Print

Hi everyone!

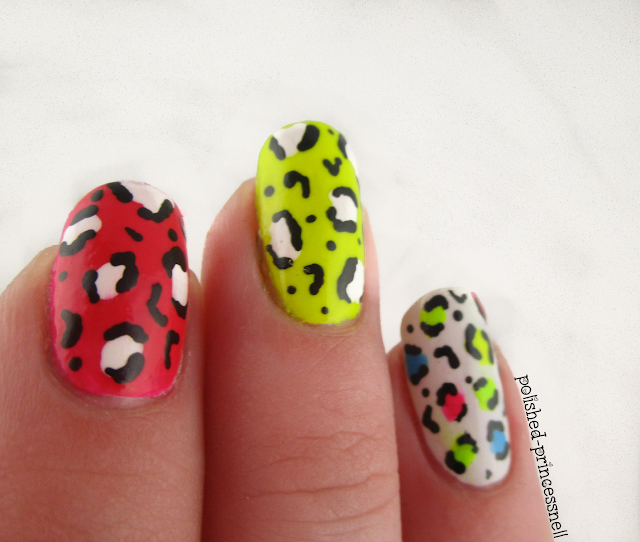
Every now and then I am going to base my nail art on one particular theme for seven days. I'm hoping that this will allow me to practice my techniques, become more creative, and challenge my thinking. This week I have decided to start bright and choose neon!

neon-leopard-print-nail-art
Neon leopard print
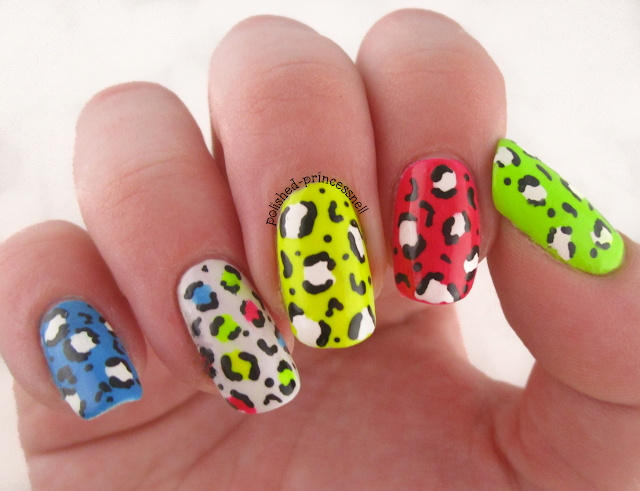
For my first mani, I went back to one of the first nail art patterns that I tried - leopard print. Leopard print is super easy to achieve and looks really cool in neon colours :)

neon-leopard-print-nail-art
L-R: Flip Flop / Bubblegum / Louis Lemon / Kensington Park Road 

For this design I used Models Own 'Louis Lemon' and 'Bubblegum' from the Iced Neon collection, 'Flip Flop' from the Polish For Tans collection, and Nails Inc. 'Kensington Park Road'. For the detail I used black and white acrylic paints and a toothpick.


neon-leopard-print-nail-art
Neon leopard print
neon-leopard-print-nail-art

neon-leopard-print-nail-art
Get your sunglasses out!
On my left hand I used the same colours but mixed them around a bit - I hate things being too uniform!

neon-leopard-print-nail-art
Say hi to Cindy :)
Thanks for reading!

Helen x

Textured Negative Space Nails

Hey guys!

Today I have a negative space manicure that I created using two polishes from the Nicole by OPI Roughles Collection. I used 'On What Grounds' (teal) and 'I'm Stucco On You' (purple). These polishes dry to a speckled, textured finish and are available in four pretty pastel shades (purple, teal, pink and yellow). I bought mine at Superdrug for £7.99 each.


negative-space-nails-roughles-textured-polish
Nicole By OPI - 'I'm Stucco On You' & 'On What Grounds?'
I actually added topcoat to this design which eliminated some of the texture. What I like about these polishes over other textured finishes are the tiny little specks of different colour - it adds a unique quality to the textured finish.


negative-space-nails-roughles-textured-polish
Negative Space

negative-space-nails-roughles-textured-polish
See the little specks of colour?
I'm still not sure if I like textured finishes or not. I have so many textured polishes in my collection, so something draws me to them, but I'm still figuring out how to use them successfully in nail art.


negative-space-nails-roughles-textured-polish
Rougles Negative Space Nails

What do you think? Yay or nay? Let me know in the comments! 

Thanks for reading!

Helen x

Monday, 22 June 2015

Gold and Turquoise Nails

Hi guys!

Today I have a pretty gold and turquoise manicure to show you. I created these as June week 3 prompt for the Weekly Nail Art Challenge I'm taking part in over on Instagram.

weekly-nail-art-challenge-wnac-turqoise-gold-stamped-nails
Weekly Nail Art Challenge - Turquoise and Gold

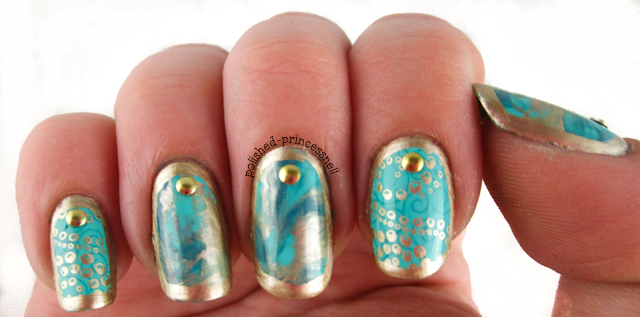
To achieve this look, I first painted my nails in a base colour of Barry M 'Green Berry', which is a vibrant turquoise polish from their Gelly Hi-Shine collection. It's probably my favourite green and is perfect for summer.

After my base colour had dried, I blobbed random dots of Barry M 'Green Berry', Collection 'After Dinner Mint' and Models Own 'Gold Chrome' onto my nails, then pressed down on them with a piece of plastic (I just used a plastic food bag for this). I love the 'saran wrap' technique as it creates such a gorgeous smoky/marbled effect on the nail. Finally, on my index and pinkie, I used my Bundle Monster stamping plate #607 to stamp two patterns using 'After Dinner Mint' and then 'Gold Chrome'. Finally, I outlined my nails using a thin striping brush and voila!


weekly-nail-art-challenge-wnac-turqoise-gold-stamped-nails
Saran wrap technique and stamping


weekly-nail-art-challenge-wnac-turqoise-gold-stamped-nails
Oooooohhhhh macro!
I also decided to try this manicure with one of my new matte topcoats - 'Satin Matt' from Essence. I picked this up from Wilko for £2 and I'm actually quite impressed with it. I'm not sure that it is that different to a regular matte topcoat, but at £2 I'm not complaining!

weekly-nail-art-challenge-wnac-turqoise-gold-stamped-nails
Essence Satin Matt 

weekly-nail-art-challenge-wnac-turqoise-gold-stamped-nails
Matte gold and turquoise nails
I definitely prefer these nails glossy as I think the marbled effect has more depth than when they are mattified. What is your preference? Glossy or matte?

Thanks for reading!

Helen

Sunday, 10 May 2015

High Heels and Suspenders!

Hi everyone!

Last night I decided to make my own sheer tints in order to create a look I've been wanting to try for ages:

 'High Heels and Suspenders'

To create my own tints, I simply used a cheap clear polish (this one from Poundland), poured a little out to make room, and added drops of Barry M 'Black' testing after every few drops to check the opacity. For the tint shown in this manicure, there are around 8 drops in the bottle and I used two coats on the nail. I also repeated this with a red polish (using Collection 'Lady In Red'), however I required quite a large number of drops added to the clear base in order to make it red-tones and not pink.

I decided to name my new tints 'High Heels' and 'Suspender'! In keeping with the theme, I chose Essence 'The Black Cat' polish to add detail - this has a wonderful latex look about it, drying not-quite-shiny and not-quite-matte. You can pick it up in Wilko for £2! 

L-R: DIY black tint / The Black Cat / DIY red tint

I layered two coats of my black tint to my thumb, index and pinkie finger, then two layers of my red tint to my middle and ring fingers. I added Sally Hansen Insta-Dry Topcoat at this stage to dry the tints, and to give some longevity to the polish. I didn't use topcoat again in this manicure as I wanted the latex effect to be apparent.


Using a dotting tool and a striping brush, I created polka dots and stripes which remind me of saucy stockings! My ring finger is inspired by a corset, and I love how it all turned out! 


Using silver caviar beads, silver striping tape, and a couple of studs I added some much needed bling to this manicure. I found the caviar beads and studs in Poundland (seriously, get yourself over to your nearest Poundland!), and my striping tape is from Amazon.


I lost a caviar bead! Noooo!

What do you guys think of this? Have you tried making your own tints before? I have a feeling that I will be franking a lot of my own shades now - it's so easy, so fun and totally unique! There's a great overview on Girly Bits Cosmetics which outlines the do's and dont's of mixing your own polish.

Thanks for reading!

Helen x

Saturday, 25 April 2015

Mani Swap - Stripey Nails with Pink Rose Accents

Hi everyone!

It's been such a busy couple of weeks as I've started a new job and I'm finally getting my life on track again, I've not had a chance to sit down and write a proper post. But now it's the weekend I get to catch up on the fun stuff, like painting nails and writing about it! :)

Today I have a manicure that I created in a recent mani swap with Alyssa (The Girly Engineer on Instagram). It's a beautiful and delicate design, integrating chic pastel stripes with vintage style roses. Very cute! Alyssa decided to try out my sugar skull mani that I created a little while ago (blog post here), and she did an awesome job!

Mani Swap with Alyssa AKA @thegirlyengineer
My nails are on the left, Alyssa's nails are on the right

For this design I decided to use quite muted colours, as I wanted this to be as delicate as possible, I chose the gorgeous Rimmel 'Rose Libertine', (a lovely dusty pink) and Barry M 'Kiss Me Quick' for the roses, with Essie 'Mint Candy Apple' leaves. My base was Barry M 'Coconut' and Rimmel 'Breakfast In Bed'.

L-R: Rose Libertine / Kiss Me Quick / Coconut / Mint Candy Apple / Breakfast In Bed

I just want to take a moment to talk about my base colour - Barry M's amazing Coconut. This is a shade I've been wanting to get my hands on for a while. It is the perfect base for nail art as it is creamy off-white (almost nude), so it doesn't have the harsh starkness that some white polishes have. It is up there with OPI 'My Vampire Is Buff' as my favourite nude-ish base, but at only £3.99 a bottle it's an absolute steal compared to brands such as OPI! Here is a photo of Coconut on it's own:

Barry M Coconut, available in Boots and Superdrug for £3.99

The final product!

This was my first attempt at roses, so they are a bit 'blobby' and don't have the detail that I would have wanted, but I'll definitely try the technique again. Overall I'm happy with the outcome, and it was so much fun finally being able to do a mani swap, I'm hoping there'll be many more in the future!

Thanks for reading!

Helen x

Saturday, 11 April 2015

Rockstud Nails! Inspired by Valentino

Hello lovely people!

When I was 14 I received a Valentino perfume for Christmas. I remember being totally won over by the packaging, lots of bright colours and a crisp-looking cubed bottle. I cannot for the life of me find an image of the particular perfume online, which is a total disappointment, but I can assure you it was gorgeous! Recently I stumbled upon Valentino's new Rockstud Collection on Instagram, and again I'm totally won over - I love the contrast of bright colours with hints of gold accent coming from the studs which adorn each item. At approximately £1500, I'm not going to be able to afford/justify buying a Valentino bag, but the design is perfect to translate onto nails!

Valentino - Rockstud Collection

As always, I flicked through my swatch book to find the most suitable colours, and ended up using: Ciate 'Mojito', Rimmel 'Raw As Night', Rimmel 'Black Cherries', Sally Hansen 'Butter-fly Stroke', Seche 'Snapdragon',  and Nails Inc. 'Kensington Park Road'.


L-R: Mojito / Raw As Night / Black Cherries / Butter-fly Stroke / Snapdragon / Kensington Park Road

I completed the whole design freehand - no striping tape, no vinyls, no template at all - which I am very proud of, particularly my index and pinkie fingers! I added studs to every nail to keep in theme (any excuse to stick things to my nails!) 

Valentino Inspired Nails
I absolutely love wearing these, they are so bright and cheerful and totally me. I want to replicate this again in a few months to see if I can improve on my 'V' shapes, but I am absolutely happy with this as a first attempt.

Here are a few more photos:


And here is a final shot of both hands. I definitely think that I am getting better using my non-dominant hand for freehand designs, and I sometimes find that my left hand is actually better than my right. Maybe it's because I'm concentrating more? 


I hope you like these as much as I do. As always I'd LOVE to hear what you think, so please feel free to comment below or leave a message on my Facebook page!

Thanks for reading!

Helen x
PS If anyone would like to buy me a Valentino bag, I will wholeheartedly accept! :)

Saturday, 4 April 2015

Freehand Sugar Skull

Hello my lovelies!

I'm currently taking part in a nail art challenge which is being held on Instagram by @nailzz_designzz_, and day 3 is 'freehand'. I thought that this would be a good time to whip out my trusty Idiot's Guides Nail Art book written by The Lacquerologist (which I talk about here). I LOVE the sugar skull design, and decided to recreate it for this mani. Emily has a great tutorial very similar to the one in her book on her blog, so take a look!

For this mani I used the following polishes: Nails Inc. 'Notting Hill Gate', OPI 'My Boyfriend Scales Walls', Rimmel 'Black Out', Ciate 'Big Yellow Taxi', Seventeen 'Orange Soda', and Nails Inc. 'Kensington Park Road'.


L-R: Big Yellow Taxi / Black Out / My Boyfriend Scales Walls / Kensington Park Road / Orange Soda
Front: Notting Hill Gate (pink)

And here it is:


Sugar skull accent


I'm currently still using some brushes that I bought from Amazon and Poundland for my designs, but they aren't the best quality unfortunately. I have just ordered these (recommended on various blogs) so hopefully my detail can be a bit better once they arrive!


I absolutely love how this turned out - it's not perfect by any stretch of the imagination but my freehand skills are getting better all the time and I think sugar skulls are the perfect practising focus as they look even better when they aren't quite perfect! 

I'd love to hear your thoughts so please feel free to leave a comment :)

Thanks for reading!

Helen x