Hi everyone!
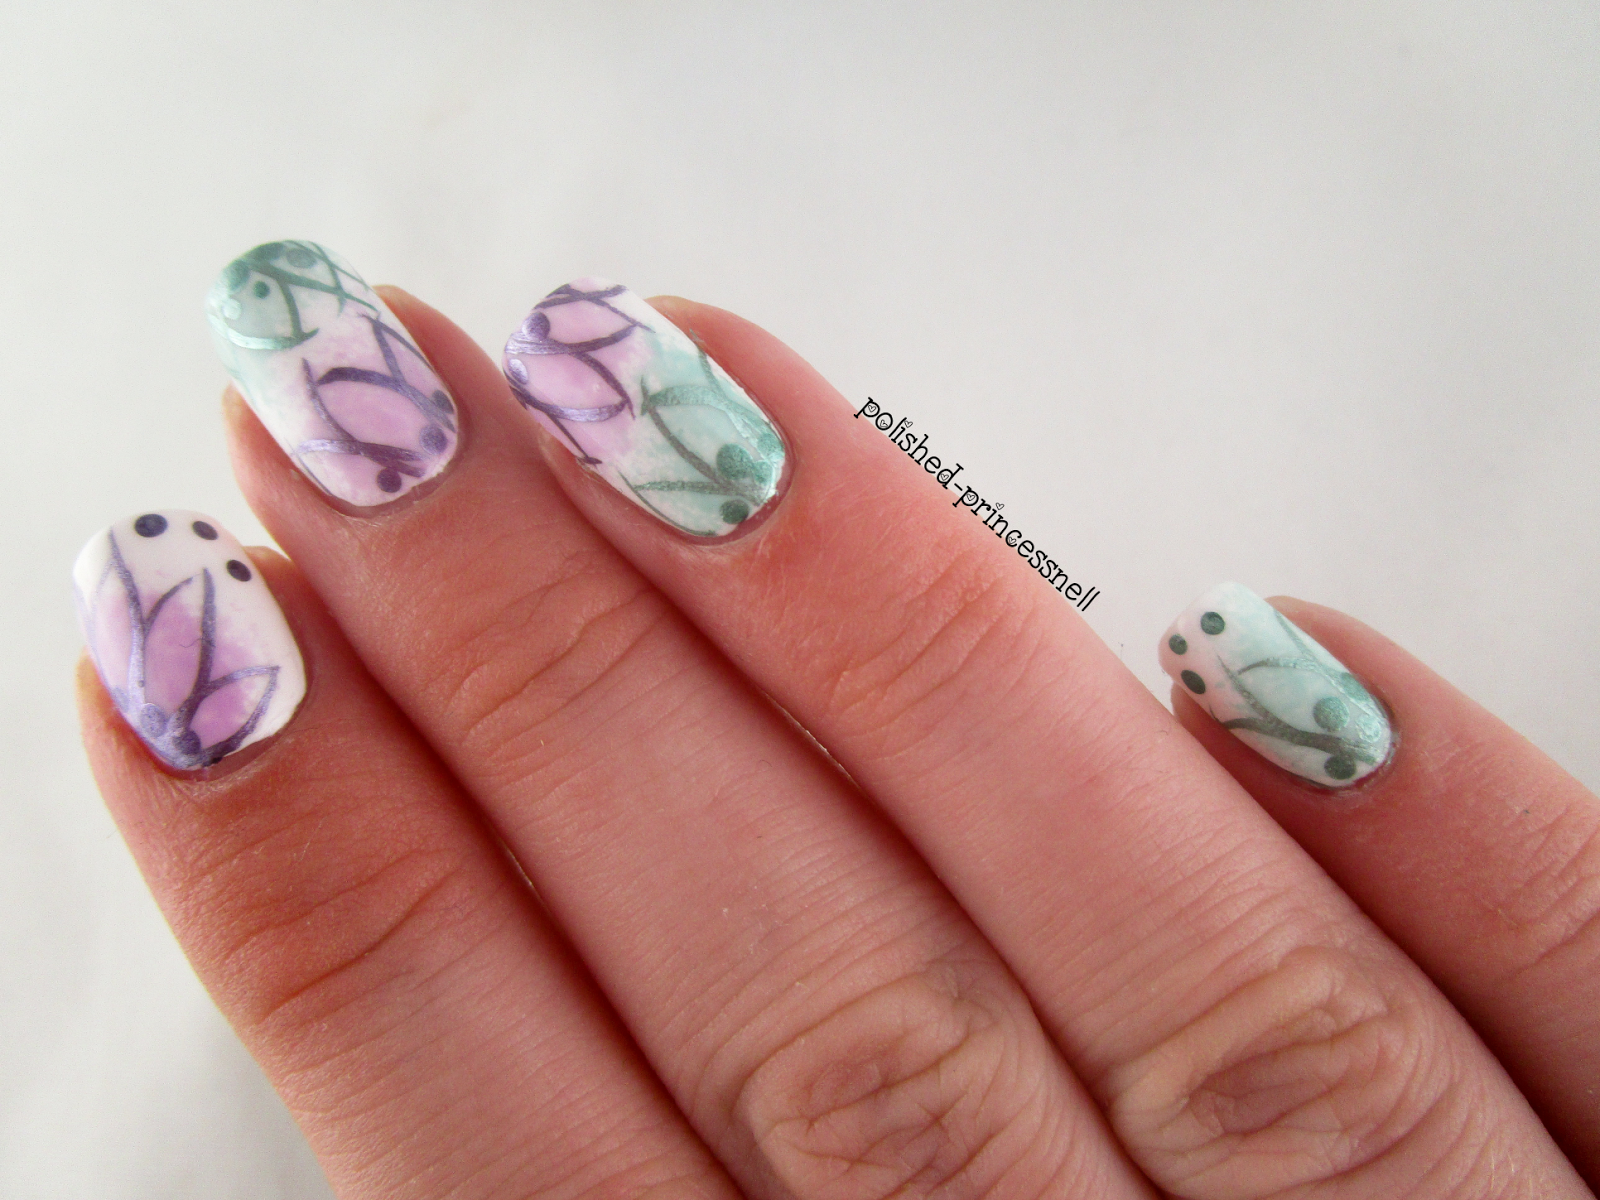
This week's prompt for the Weekly Nail Art Challenge over on Instagram is 'mint and lilac' with a summer theme. I decided to create an abstract flower design for this one :)
I started off with a base of Essence 'Wild White Ways', then using a torn sponge, I dabbed on Ciate 'Sugar Plum' and Essie 'Mint Candy Apple'. Finally, I added the flower outlines using a striping brush and two polishes from Claire's Liquid Metal collection - 'Teal' and 'Purple' (very imaginatively named, Essence!)
I kind of wish I hadn't put two flowers on my middle and ring fingers, as it makes the mani seem a bit cluttered, but overall I'm really pleased with this one. It's a refreshing change as it's much more delicate than the neon designs I've been wearing recently!
As always, head over to Instagram to see all of the entries into the Weekly Nail Art Challenge - just search #wnac2015 :)
Thanks for reading!
Helen x
Showing posts with label ciate. Show all posts
Sunday, 23 August 2015
Saturday, 11 July 2015
Snakeskin Nail Art
Hello everyone!
The prompt for this week's Weekly Nail Art Challenge on Instagram is 'aminal print + gradient'. As I've worn leopard print on a few occasions recently, I wanted to do something a bit different. So I chose snakeskin!
I followed this tutorial on YouTube as I had no idea where to begin! The basic idea is to use one light, one medium, and one dark toned polish and do the following:
For the little snake design I used Bundle Monster plate BM-612 and stamped with MoYou Black Special Nail Polish and my Creative Shop Stamper (bought from Rainbow Connection).
The prompt for this week's Weekly Nail Art Challenge on Instagram is 'aminal print + gradient'. As I've worn leopard print on a few occasions recently, I wanted to do something a bit different. So I chose snakeskin!
I followed this tutorial on YouTube as I had no idea where to begin! The basic idea is to use one light, one medium, and one dark toned polish and do the following:
- Paint your nails a light base colour and allow to dry
- Wrap a mesh material around the nail and sponge on your medium polish
- Carefully remove the mesh material, and repeat on all nails
- Use a smaller mesh material to sponge on your dark polish (again, remove carefully)
- Add topcoat, and you're done!
For this design I used another two of my 'untrieds' - my list is getting shorter! (I have had to purchase a whole new storage system for my untrieds as I have so many... but I'm working my way through them!)
Anyway, back to the polishes I used: OPI 'My Vampire Is Buff' (light), Ciate 'Gold Digga' (medium) and Revlon 'Jungle' (dark). I also used a tiny amount of black around the edges to add more definition to the 'scales'.
![]() |
BM-612 |
Although my index finger is by far the best, scale-wise, I'm happy with how these look! It's definitely not my favourite colour palette, it was nice to wear something different for a change.
Thanks for reading!
Helen x
As always, head over to Instagram to see all of the entries into the Weekly Nail Art Challenge - just search #wnac2015 :)
Labels:
ciate,
gradient,
Instagram,
lacquer,
mani,
manicure,
MoYou London,
nail,
nail art,
nail decals,
nail designs,
nail polish,
snakeskin nails,
stamping,
weekly nail art challenge,
wnac
Location:
Bristol, City of Bristol, UK
Tuesday, 23 June 2015
Rockstar Gel Nails!
Hey everyone!
Today I want to share with you the sparkliest nails that my hands have ever adorned!
This is a style nicknamed 'rockstar nails' and it is applied to a gel manicure.
The basic idea is:
If you want to recreate this look, I recommend heading over to Chalkboard Nails for a great tutorial (the one that I followed), which has each step explained in much more detail than I gave above!
This is so easy to create and the effect is absolutely stunning. As this is a gel manicure my nails are super glossy and the glitter really shines through, almost magnified by the topcoat.
I used two Ciate glitters that I got in my Ciate Mini Manor Advent Calendar last year - a fantastic holographic silver ('Let It Snow') and holographic pink ('Prima Ballerina'). I have been waiting for the perfect opportunity to use these and I think I found it!
I am starting to fall in love with gel manicures - there are so many possibilities using cured polish, and the prettiness lasts for ages too!
Thanks for reading!
Helen x
Today I want to share with you the sparkliest nails that my hands have ever adorned!
![]() |
Rockstar Nails |
This is a style nicknamed 'rockstar nails' and it is applied to a gel manicure.
The basic idea is:
- Clean and prep your nails for a gel manicure
- Apply a base coat and cure in an LED/UV lamp
- Apply a thin coat of gel polish and before curing sprinkle fine glitter onto the nail.
- Press lightly onto the nail to ensure the glitter adheres, then cure in your lamp.
- Apply topcoat and cure.
If you want to recreate this look, I recommend heading over to Chalkboard Nails for a great tutorial (the one that I followed), which has each step explained in much more detail than I gave above!
![]() |
Super glittery! |
![]() |
LOOK AT THE PRETTY! |
This is so easy to create and the effect is absolutely stunning. As this is a gel manicure my nails are super glossy and the glitter really shines through, almost magnified by the topcoat.
![]() |
Obligatory macro shot :) |
I used two Ciate glitters that I got in my Ciate Mini Manor Advent Calendar last year - a fantastic holographic silver ('Let It Snow') and holographic pink ('Prima Ballerina'). I have been waiting for the perfect opportunity to use these and I think I found it!
![]() |
My camera could only just pick up the holo goodness in these bottles |
![]() |
Ciate Fine Holographic Glitter - Prima Ballerina and Let It Snow |
![]() |
Can you see the holo shift?! |
I am starting to fall in love with gel manicures - there are so many possibilities using cured polish, and the prettiness lasts for ages too!
Thanks for reading!
Helen x
Labels:
ciate,
gel manicure,
gel nails,
glitter,
holo,
Instagram,
LED lamp,
mani,
manicure,
nail,
nail art,
nail designs,
nail porn,
nails,
pink,
pretty,
rockstar,
silver,
sparkle
Location:
Bristol, City of Bristol, UK
Saturday, 11 April 2015
Rockstud Nails! Inspired by Valentino
Hello lovely people!
When I was 14 I received a Valentino perfume for Christmas. I remember being totally won over by the packaging, lots of bright colours and a crisp-looking cubed bottle. I cannot for the life of me find an image of the particular perfume online, which is a total disappointment, but I can assure you it was gorgeous! Recently I stumbled upon Valentino's new Rockstud Collection on Instagram, and again I'm totally won over - I love the contrast of bright colours with hints of gold accent coming from the studs which adorn each item. At approximately £1500, I'm not going to be able to afford/justify buying a Valentino bag, but the design is perfect to translate onto nails!
As always, I flicked through my swatch book to find the most suitable colours, and ended up using: Ciate 'Mojito', Rimmel 'Raw As Night', Rimmel 'Black Cherries', Sally Hansen 'Butter-fly Stroke', Seche 'Snapdragon', and Nails Inc. 'Kensington Park Road'.
I completed the whole design freehand - no striping tape, no vinyls, no template at all - which I am very proud of, particularly my index and pinkie fingers! I added studs to every nail to keep in theme (any excuse to stick things to my nails!)
I absolutely love wearing these, they are so bright and cheerful and totally me. I want to replicate this again in a few months to see if I can improve on my 'V' shapes, but I am absolutely happy with this as a first attempt.
Here are a few more photos:
And here is a final shot of both hands. I definitely think that I am getting better using my non-dominant hand for freehand designs, and I sometimes find that my left hand is actually better than my right. Maybe it's because I'm concentrating more?
I hope you like these as much as I do. As always I'd LOVE to hear what you think, so please feel free to comment below or leave a message on my Facebook page!
Thanks for reading!
Helen x
PS If anyone would like to buy me a Valentino bag, I will wholeheartedly accept! :)
When I was 14 I received a Valentino perfume for Christmas. I remember being totally won over by the packaging, lots of bright colours and a crisp-looking cubed bottle. I cannot for the life of me find an image of the particular perfume online, which is a total disappointment, but I can assure you it was gorgeous! Recently I stumbled upon Valentino's new Rockstud Collection on Instagram, and again I'm totally won over - I love the contrast of bright colours with hints of gold accent coming from the studs which adorn each item. At approximately £1500, I'm not going to be able to afford/justify buying a Valentino bag, but the design is perfect to translate onto nails!
![]() |
Valentino - Rockstud Collection |
As always, I flicked through my swatch book to find the most suitable colours, and ended up using: Ciate 'Mojito', Rimmel 'Raw As Night', Rimmel 'Black Cherries', Sally Hansen 'Butter-fly Stroke', Seche 'Snapdragon', and Nails Inc. 'Kensington Park Road'.
![]() |
L-R: Mojito / Raw As Night / Black Cherries / Butter-fly Stroke / Snapdragon / Kensington Park Road |
![]() |
Valentino Inspired Nails |
Here are a few more photos:
And here is a final shot of both hands. I definitely think that I am getting better using my non-dominant hand for freehand designs, and I sometimes find that my left hand is actually better than my right. Maybe it's because I'm concentrating more?
I hope you like these as much as I do. As always I'd LOVE to hear what you think, so please feel free to comment below or leave a message on my Facebook page!
Thanks for reading!
Helen x
PS If anyone would like to buy me a Valentino bag, I will wholeheartedly accept! :)
Labels:
chevron,
ciate,
freehand,
gold,
Instagram,
manicure,
nail,
nail art,
nail designs,
nail polish,
nails,
nails inc.,
negative space,
polish,
rimmel,
rockstud,
Sally Hansen,
seche,
studs,
valentino
Location:
Bristol, City of Bristol, UK
Saturday, 4 April 2015
Freehand Sugar Skull
Hello my lovelies!
I'm currently taking part in a nail art challenge which is being held on Instagram by @nailzz_designzz_, and day 3 is 'freehand'. I thought that this would be a good time to whip out my trusty Idiot's Guides Nail Art book written by The Lacquerologist (which I talk about here). I LOVE the sugar skull design, and decided to recreate it for this mani. Emily has a great tutorial very similar to the one in her book on her blog, so take a look!
For this mani I used the following polishes: Nails Inc. 'Notting Hill Gate', OPI 'My Boyfriend Scales Walls', Rimmel 'Black Out', Ciate 'Big Yellow Taxi', Seventeen 'Orange Soda', and Nails Inc. 'Kensington Park Road'.
And here it is:
I'm currently still using some brushes that I bought from Amazon and Poundland for my designs, but they aren't the best quality unfortunately. I have just ordered these (recommended on various blogs) so hopefully my detail can be a bit better once they arrive!
I absolutely love how this turned out - it's not perfect by any stretch of the imagination but my freehand skills are getting better all the time and I think sugar skulls are the perfect practising focus as they look even better when they aren't quite perfect!
I'd love to hear your thoughts so please feel free to leave a comment :)
Thanks for reading!
Helen x
I'm currently taking part in a nail art challenge which is being held on Instagram by @nailzz_designzz_, and day 3 is 'freehand'. I thought that this would be a good time to whip out my trusty Idiot's Guides Nail Art book written by The Lacquerologist (which I talk about here). I LOVE the sugar skull design, and decided to recreate it for this mani. Emily has a great tutorial very similar to the one in her book on her blog, so take a look!
For this mani I used the following polishes: Nails Inc. 'Notting Hill Gate', OPI 'My Boyfriend Scales Walls', Rimmel 'Black Out', Ciate 'Big Yellow Taxi', Seventeen 'Orange Soda', and Nails Inc. 'Kensington Park Road'.
![]() |
L-R: Big Yellow Taxi / Black Out / My Boyfriend Scales Walls / Kensington Park Road / Orange Soda Front: Notting Hill Gate (pink) |
And here it is:
![]() |
Sugar skull accent |
I'm currently still using some brushes that I bought from Amazon and Poundland for my designs, but they aren't the best quality unfortunately. I have just ordered these (recommended on various blogs) so hopefully my detail can be a bit better once they arrive!
I absolutely love how this turned out - it's not perfect by any stretch of the imagination but my freehand skills are getting better all the time and I think sugar skulls are the perfect practising focus as they look even better when they aren't quite perfect!
I'd love to hear your thoughts so please feel free to leave a comment :)
Thanks for reading!
Helen x
Labels:
ciate,
freehand,
Instagram,
manicure,
nail,
nail art,
nail designs,
nail polish,
nails,
nails inc.,
opi,
pink,
polish,
rimmel,
sugar skull
Location:
Bristol, City of Bristol, UK
Sunday, 29 March 2015
Inspired By Underwear...
Hello lovelies!
Today's mani is inspired by one of my favourite underwear sets. Hey, we can't help what inspires us, right?! This little set is made by Freya and it is just so pretty - I love the mix of colours and thought they would translate nicely onto my nails! .You can buy the set here.
I had a good flick through my swatch book to find colours that matched as closely as possible, which I think I succeeded in! For this design I used Ciate 'Mojito', Barry M 'Dragon Fruit', Nicole by OPI 'I Can Teal You Like Me', and China Glaze 'I Sea The Point'. I was worried that the pink and lime green polishes would struggle to cover the dark blue base, but luckily they are pigment heavy polishes so I didn't have any troubles! I topped it off with my all time favourite topcoat HK Girl by Glisten & Glow.
I'm not too happy with the brush strokes on this, especially on my ring finger, but it's all practice! If anyone has any advice on brush techniques please do pass it on to me - I'd be very grateful!
Overall I'm pretty pleased with these ones, even though it's a little on the messy side, I love the colours and the fact that I can match my underwear to my nails makes me happy!
Thanks for reading!
Helen x
Today's mani is inspired by one of my favourite underwear sets. Hey, we can't help what inspires us, right?! This little set is made by Freya and it is just so pretty - I love the mix of colours and thought they would translate nicely onto my nails! .You can buy the set here.
![]() |
L-R: I Can Teal You Like Me / Mojito / Dragon Fruit / I Sea The Point |
I'm not too happy with the brush strokes on this, especially on my ring finger, but it's all practice! If anyone has any advice on brush techniques please do pass it on to me - I'd be very grateful!
![]() |
Inspired by my pants! :) |
Overall I'm pretty pleased with these ones, even though it's a little on the messy side, I love the colours and the fact that I can match my underwear to my nails makes me happy!
Thanks for reading!
Helen x
Labels:
barry m,
ciate,
Instagram,
nail,
nail art,
nail designs,
nail polish,
nails,
opi,
polish
Location:
Bristol, City of Bristol, UK
Wednesday, 25 March 2015
Monochrome Glam! - Black and White Nail Art Design
Hello polished lovelies!
Today I have created something that I've never tried before - a monochrome mani. I've always been reluctant to try a simple black and white colour scheme for fear of messing it up - those crisp lines and sleek designs are so intimidating!. A monochrome manicure is the height of sophistication, glamour and chic - three words which certainly do not apply to me! But I've always loved the look, so here it is:
My palette for this one was simple: Rimmel 'Black Out', Barry M 'Matt White', Ciate 'Amazing Gracie' and Barry M matte topcoat.
I clearly haven't taken advantage of the Ciate Mini Manor advent calendar that I got in January as I had no idea how gorgeous 'Amazing Gracie' is! It's a barely-there nude with a sheer finish. You can hardly even notice it on the nail under stamping, but it is perfect for laying down before working on your 'negative space' as it is so natural looking. I applied two coats to this mani. I love it!
I wanted to incorporate negative spacing and stamping into this, as it adds a feeling of delicacy to the look, don't you think? The stamping design is from Cheeky Jumbo Plate 10 'Happy Nails' and is wonderfully intricate. For a matte manicure, always remember to add your favourite non-smudging topcoat first to protect the design - something that I didn't do here. My design was so neat until I added the dreaded matte topcoat which instantly smudged black into white, so frustrating!
Overall I'm pretty pleased with how this turned out. I don't know if the matte finish really works in this (Mr Polished seems to think it doesn't), but I think everything is better mattified! I'm not sure I can pull off the monochrome look (certainly not for every day wear anyway) but I am really enjoying creating my own designs, finding my own style and understanding what works for me.
Thanks for reading!
Helen x
Today I have created something that I've never tried before - a monochrome mani. I've always been reluctant to try a simple black and white colour scheme for fear of messing it up - those crisp lines and sleek designs are so intimidating!. A monochrome manicure is the height of sophistication, glamour and chic - three words which certainly do not apply to me! But I've always loved the look, so here it is:
![]() |
The finished product! |
My palette for this one was simple: Rimmel 'Black Out', Barry M 'Matt White', Ciate 'Amazing Gracie' and Barry M matte topcoat.
![]() |
L-R: Barry M Matte Topcoat / Rimmel Black Out / Barry M Matt White / Ciate Amazing Gracie / Essence Black Stampy Polish / MoYou Stamper |
![]() |
Ciate Amazing Gracie - available here for £9 |
I clearly haven't taken advantage of the Ciate Mini Manor advent calendar that I got in January as I had no idea how gorgeous 'Amazing Gracie' is! It's a barely-there nude with a sheer finish. You can hardly even notice it on the nail under stamping, but it is perfect for laying down before working on your 'negative space' as it is so natural looking. I applied two coats to this mani. I love it!
I wanted to incorporate negative spacing and stamping into this, as it adds a feeling of delicacy to the look, don't you think? The stamping design is from Cheeky Jumbo Plate 10 'Happy Nails' and is wonderfully intricate. For a matte manicure, always remember to add your favourite non-smudging topcoat first to protect the design - something that I didn't do here. My design was so neat until I added the dreaded matte topcoat which instantly smudged black into white, so frustrating!
![]() |
Cheeky Stamping Plate #10 - Happy Nails is available here |
![]() |
Monochrome Glam! |
Overall I'm pretty pleased with how this turned out. I don't know if the matte finish really works in this (Mr Polished seems to think it doesn't), but I think everything is better mattified! I'm not sure I can pull off the monochrome look (certainly not for every day wear anyway) but I am really enjoying creating my own designs, finding my own style and understanding what works for me.
Thanks for reading!
Helen x
Labels:
barry m,
ciate,
crafty fingers,
Instagram,
nail,
nail art,
nail designs,
nail polish,
nails
Location:
Bristol, City of Bristol, UK
Monday, 23 March 2015
Pink, Black and Gold
It's a day for blog-writing it would seem! I'm on a roll today, so please bear with me while I upload all of the posts I've been working on over the past couple of weeks.
I've always loved pink - anyone who knows me will understand that if a product is available in pink, then that's the one I will buy. My nail polish collection is largely dominated by pinky tones - glitters, gels, cremes, neons, sheers - I have them all in pink. But alongside loving pink, I also like to be a bit edgy. I'm not a super-girly type of girl; I don't spend hours doing my hair (it's lucky if I even brush it...), I very rarely wear make-up, and I can't remember the last time I wore a pair of heels. So I like my manicures to represent my personality as well as how much I love the colour pink. Therefore I bring to you *this mani*, which I put together (quickly, as you can see from the clean-up job...) a couple of weeks ago.
I wanted to incorporate a shiny black polish with gold stud accents to contrast with the neon pink polish that I chose to use. This is completely my own design, which isn't something that I'm used to doing! I find a lot of my inspiration on Instagram, and love recreating other ladies work to practice my skills. My next step is to create more individual and original designs, but this was a first for me.
For this mani I used my favourite neon pink by Models Own 'Dinky Pinky', Ciate 'Ladylike Luxe' for the gold, topped with Models Own gold glitter, and Barry M 'Black'. I find that Barry M 'Black' tends to be somewhat dull without a super shiny topcoat, so I chose to use Glisten&Glow's HK Girl Fast Drying Topcoat, as it always leaves such a jelly-licious plumped up coating! The studs were bought from Boots.
I just want to give a quick overview of a couple of the polishes in this mani:
Models Own Dinky Pinky is a fabulous neaon, it's not so 'in-your-face' that it's unwearable, but it certainly does pop! I find the consistency to be perfect and it glides to an opaque coverage in two thin coats. Although it doesn't exactly compliment my skin-tone, that's fine by me because pink!
Ciate Ladylike Luxe is a polish from their 2014 'Mini Manor' advent calendar. When I first tried it out I really wasn't that impressed, however I have found it great when used as a base for glitter and for adding detail over black (as seen in the picture below). The golds in this mani are somewhat muted and dull, but it tones down the brightness of the pink which is definitely needed.
I absolutely loved wearing this mani. Every girl needs a bit of bling in their life, right?!
Thanks for reading!
Helen x
I've always loved pink - anyone who knows me will understand that if a product is available in pink, then that's the one I will buy. My nail polish collection is largely dominated by pinky tones - glitters, gels, cremes, neons, sheers - I have them all in pink. But alongside loving pink, I also like to be a bit edgy. I'm not a super-girly type of girl; I don't spend hours doing my hair (it's lucky if I even brush it...), I very rarely wear make-up, and I can't remember the last time I wore a pair of heels. So I like my manicures to represent my personality as well as how much I love the colour pink. Therefore I bring to you *this mani*, which I put together (quickly, as you can see from the clean-up job...) a couple of weeks ago.
I wanted to incorporate a shiny black polish with gold stud accents to contrast with the neon pink polish that I chose to use. This is completely my own design, which isn't something that I'm used to doing! I find a lot of my inspiration on Instagram, and love recreating other ladies work to practice my skills. My next step is to create more individual and original designs, but this was a first for me.
L-R: Ciate Ladylike Luxe / Models Own Dinky Pinky / Models Own gold glitter / Barry M Black / Studs from Boots |
For this mani I used my favourite neon pink by Models Own 'Dinky Pinky', Ciate 'Ladylike Luxe' for the gold, topped with Models Own gold glitter, and Barry M 'Black'. I find that Barry M 'Black' tends to be somewhat dull without a super shiny topcoat, so I chose to use Glisten&Glow's HK Girl Fast Drying Topcoat, as it always leaves such a jelly-licious plumped up coating! The studs were bought from Boots.
Ugh, my clean-up around the middle finger is terrible!! |
LOVE these colours together! |
Models Own Dinky Pinky is a fabulous neaon, it's not so 'in-your-face' that it's unwearable, but it certainly does pop! I find the consistency to be perfect and it glides to an opaque coverage in two thin coats. Although it doesn't exactly compliment my skin-tone, that's fine by me because pink!
Ciate Ladylike Luxe is a polish from their 2014 'Mini Manor' advent calendar. When I first tried it out I really wasn't that impressed, however I have found it great when used as a base for glitter and for adding detail over black (as seen in the picture below). The golds in this mani are somewhat muted and dull, but it tones down the brightness of the pink which is definitely needed.
Please ignore the off-centre pinky stud placement! |
I absolutely loved wearing this mani. Every girl needs a bit of bling in their life, right?!
Thanks for reading!
Helen x
Labels:
barry m,
ciate,
crafty fingers,
Instagram,
nail,
nail art,
nail designs,
nail polish,
nails
Location:
Bristol, City of Bristol, UK
Ikat Design
![]() |
An Idiot's Guide To Nail Art, by Emily Draher |
Hello polished lovelies!
It's been so long since I posted anything that I'm starting to actually feel guilty for not writing about all of my latest manis! I really wanted to write this blog as an online diary of my journey through the land of all things nail related - more for myself than anything else, although I will be overjoyed if I start to get regular readers. If you're out there reading this, then thank you so much!
I recently got my hands on Emily Draher's (AKA @The Lacquerologist's book – An Idiot’s
Guides To Nail Art, which I just realised I have never actually written a blog
post about. I’m going to sum it up here – you need this book in your life!
Emily has presented her designs in such an accessible way, the pictorials are
clear, concise and consistent, and the range of nail art is fantastic. From a simple
French manicure (with a modern twist) up to water marbling and freehand nail
art, this book honestly has it all. I’m currently using it as my ‘go-to’ for
techniques that I haven’t yet tried/need to practice at. It also has wonderful
sections on the biology behind nails, nail and hand care, nail art products and
tools, and an invaluable list of online retailers, blogs, websites and sources
to find further information. You can buy this book now here on Amazon for
£11.
Now, onto the mani! The front cover of An Idiot’s Guide To Nail
Art is a fresh looking Ikat design, using a cool green polish. I knew as soon as I saw this book advertised online that I wanted to
buy it and instantly recreate the iconic Ikat design that has become so popular
in nail art and fashion over the past year. I used a slightly different colour scheme to Emily, deciding on two untrieds from by ever-growing collection: NYC ‘Summer in
NYC’ and Ciate ‘mojito’. I also used my sturdy favourite black and white
polishes from Barry M. To add a little accent to my non-Ikat nails, I chose to
place some black studs that I bought from eBay on them (I love studs!)
Although I was following the tutorial from the book, I found this design quite difficult to recreate. In hindsight my designs were too large and the green is almost lost because of this. Also, this was my first time attempting any sort of ‘brush work’ using my nail art brushes, and as you can see it leaves a lot to be desired! Finally, my clean-up is atrocious, although I partially blame the lack of light when I was actually doing this design (I have since bought some bright lamps to put in my nail art corner, so now I have no excuses!)
L-R: Barry M - Black / NYC - Summer in NYC / Ciate - mojito / Barry M - Matt White |
Although I was following the tutorial from the book, I found this design quite difficult to recreate. In hindsight my designs were too large and the green is almost lost because of this. Also, this was my first time attempting any sort of ‘brush work’ using my nail art brushes, and as you can see it leaves a lot to be desired! Finally, my clean-up is atrocious, although I partially blame the lack of light when I was actually doing this design (I have since bought some bright lamps to put in my nail art corner, so now I have no excuses!)
I really like Ciate's 'mojito'. It's such a shame there's not more to be seen in this design! |
I love the black studs - they really pull this design together. |
I think I am definitely in need of practicing my Ikat skills, and need to not be so excited when using a brush! I love these colours and they are going to be a firm favourite of mine in the summer months. NYC is a brand that I haven't really explored, but I am loving their fun and affordable range- perfect for budget-conscious folk!
Thanks for reading!
Helen x
Thanks for reading!
Helen x
Labels:
barry m,
ciate,
crafty fingers,
ikat,
Instagram,
nail,
nail art,
nail designs,
nail polish,
nails,
nyc,
polish
Location:
Bristol, City of Bristol, UK
Subscribe to:
Posts (Atom)