Hi guys!
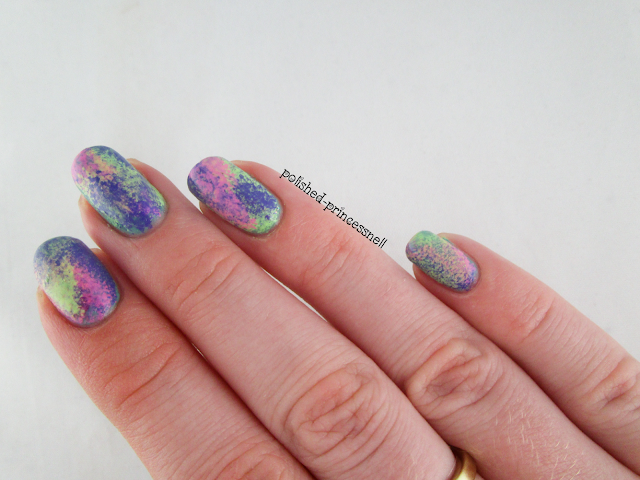
Today I have some pretty stamped nails to show you that I created after being inspired by this manicure by Sveta Sanders on Instagram. I loved the colours together and thought it seemed simple enough to recreate without too much hassle!
I started with a base of Fuse Gelnamel 'Intens-so-fly' which is a muted turquoise gel. You can't actually see much of the base on my nails as it was mostly covered by the sponging, which I am counting as a good thing as I really don't like the colour! I then used Models Own 'Pukka Purple', Models Own 'Sun Hat' and China Glaze 'Grass Is Lime Greener' to randomly sponge the colours onto the nail, making sure to overlap them. I love how this looks! It reminds me of graffiti :)
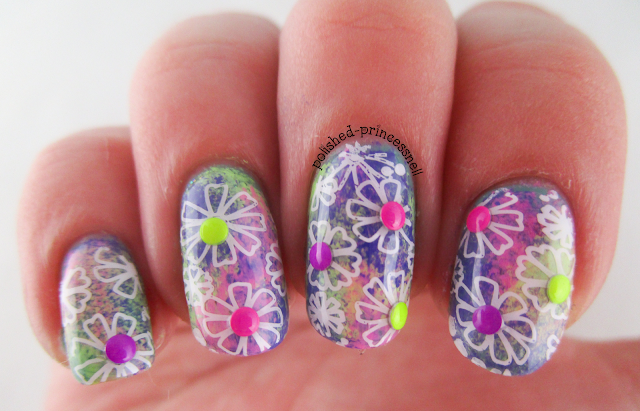
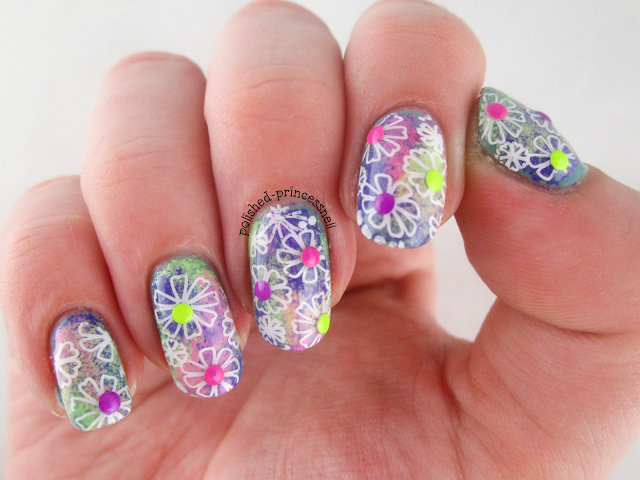
Not content with the base as it was, I decided to add a touch of white stamping using MoYou London Pro-08 plate and one of the cute flowered designs.
To finish the look, I used neon studs as the centre of the larger flowers and topped with topcoat to seal it all in.
Hope you like these as much as I do! <3
Thanks for reading!
Helen x
Showing posts with label gel nails. Show all posts
Showing posts with label gel nails. Show all posts
Sunday, 23 August 2015
Tuesday, 11 August 2015
Pink and Black Chevron Nails
Hi guys!
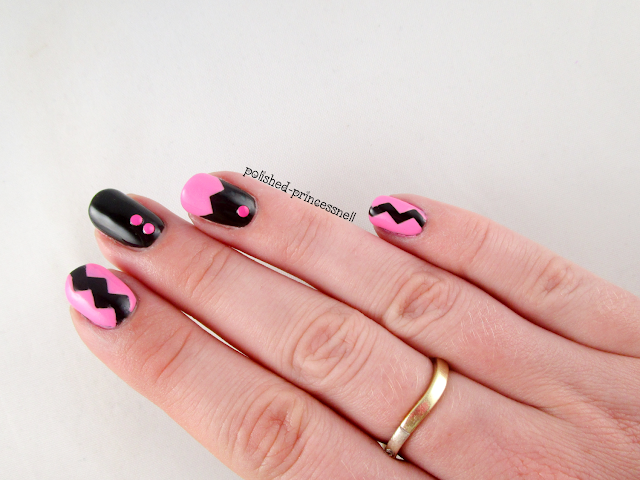
If you follow me on Instagram, you might know that I recently had a nail disaster where the majority of my thumb nail snapped off :( I thought that it would all be fine and that I'd just make do with creating four-finger manicures until it grew back to a suitable length, but lo and behold the next day my index nail snaps too. So, I'm back to the nub club! Although I love having long nails, some designs just look better on shorties, so I'm trying out a few tried and tested colour combos and designs to compliment my new length (or lack thereof!)
For this mani I used one of my favourite colour combinations. I just love how pink and black always looks so striking in a manicure - it's fun, edgy and girly all at once! The black here is Aimeili gel polish in 'Blackpool' (colour #007). I used my new chevron nail vinyls from She Sells Seashells, and Models Own 'Sun Hat'. I must take a moment to gasp in awe at how beautifully this polish layers over black. Can you believe that this is one (thick) coat over black, with no white undies to speak of?! No? Me neither.
As you can see, I'm shying away from including my thumb in any pictures for a while as it is in such a sorry state. Hopefully soon she will be back in my photos, as I'm not sure I like this four-fingered look so much - it feels incomplete!
Thanks for reading!
Helen x
Monday, 27 July 2015
Chameleon Thermal Gel Polish
Hi everyone!
Last week whilst I was away visiting family I tested out one of my newer purchases - a thermal gel polish from a brand called Aimeili. I know that the quality of gel polishes can be awful if you don't buy the right ones, but I find a price tag of £15+ a little too expensive for most regular gel shades. So I turned to Amazon for inspiration, and along came this polish for £4.49 and free delivery! I chose the shade named 'Hot Pink to Glitter White' which is product number TC04, however there are loads to choose from and I'll definitely be ordering more.
I applied this gel alongside Red Carpet 'Structure' basecoat, Red Carpet 'Brilliance' topcoat and Le Mini Macaron LED lamp. I have read conflicting reviews about mixing brands of gel polishes, but so far I have had no issue with this combination. This is by far the best gel manicure I have had in terms of durability and staying power!
This gel is a gorgeous creamy-translucent white when it is warm, turning into a deep hot pink when cold. As my nails are at quite a long length at the moment, I found that I had a cute French manicure type effect going on most of the time. On shorter nails I imagine this wouldn't be quite so obvious, and the 'resting' colour would be more in line with the picture below.The white shade is not opaque (even with three layers), however it is still beautiful!
I am incredibly pleased with my purchase here and can't wait to try out more. I wore this manicure for one whole week (which is unheard of for me!) and I had absolutely no issues with chipping, dulling or general wear-and-tear. All of these photos were taken just before I removed the polish, so you can see just how great this one lasted.
What do you guys think? Have you tried out any of Aimeli's polishes before? Let me know in the comments!
Thanks for reading!
Helen x
Labels:
french manicure,
gel manicure,
gel nails,
glitter,
gradient,
Instagram,
lacquer,
le mini macaron,
LED lamp,
mani,
manicure,
nail,
nail polish,
nails,
pink,
polish,
swatch
Location:
Bristol, City of Bristol, UK
Monday, 13 July 2015
Nautical Nails
Hello!
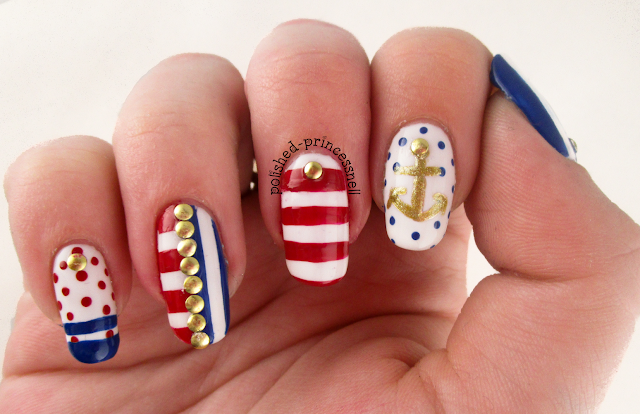
I am very proud of the mani I am showing you today, and I actually think it might be the 'neatest' design that I have created so far! Except for when I added topcoat and smudged it all. Oh well! Here are the nails:
My base for this is Red Carpet Manicure white gel polish. I like to choose a gel base when I know I will be attempting a design that may need a few changes or nails that need completely redoing due to my mistakes. With gel you just wipe away the mistake with acetone-free polish remover and start over!
The red polish I used is OPI 'Cinnamon Sweet', and the blue is Rimmel 'Blue Eyed Girl'. I particularly like the red in this design as it's not a bright 'pillar-box' red or pink toned - I think it's perfectly nautical!
I freehanded the little anchor on my index finger with Models Own 'Gold Chrome' and topped it with Ciate 'Ladylike Luxe'.
I used mini gold discs that I bought in a gem wheel from Poundland to add accents to each nail.
I absolutely love these nails, and hope you do too!
Thanks for reading!
Helen x
I am very proud of the mani I am showing you today, and I actually think it might be the 'neatest' design that I have created so far! Except for when I added topcoat and smudged it all. Oh well! Here are the nails:
The red polish I used is OPI 'Cinnamon Sweet', and the blue is Rimmel 'Blue Eyed Girl'. I particularly like the red in this design as it's not a bright 'pillar-box' red or pink toned - I think it's perfectly nautical!
I freehanded the little anchor on my index finger with Models Own 'Gold Chrome' and topped it with Ciate 'Ladylike Luxe'.
I used mini gold discs that I bought in a gem wheel from Poundland to add accents to each nail.
I absolutely love these nails, and hope you do too!
Thanks for reading!
Helen x
Labels:
awesome,
crafty fingers,
freehand,
gel manicure,
gel nails,
Instagram,
lacquer,
le mini macaron,
LED lamp,
mani,
manicure,
nail,
nail art,
nail designs,
nail polish,
nails,
nautical nails,
summer nails
Location:
Bristol, City of Bristol, UK
Tuesday, 23 June 2015
Rockstar Gel Nails!
Hey everyone!
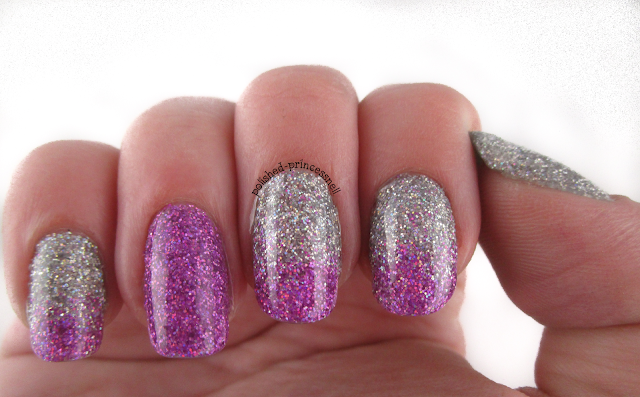
Today I want to share with you the sparkliest nails that my hands have ever adorned!
This is a style nicknamed 'rockstar nails' and it is applied to a gel manicure.
The basic idea is:
If you want to recreate this look, I recommend heading over to Chalkboard Nails for a great tutorial (the one that I followed), which has each step explained in much more detail than I gave above!
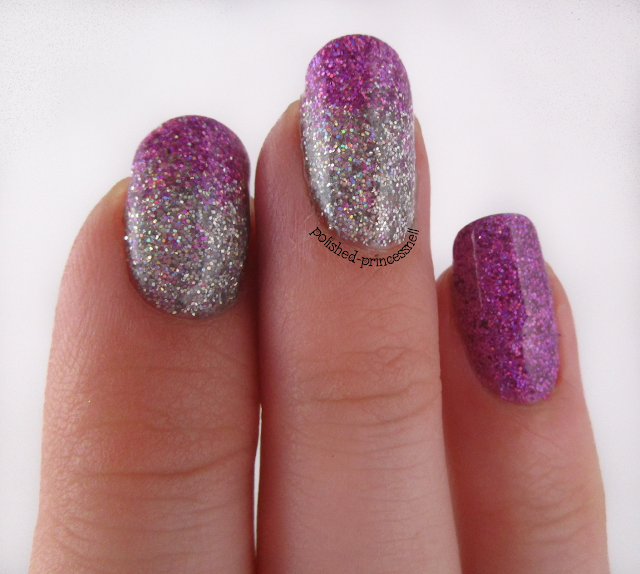
This is so easy to create and the effect is absolutely stunning. As this is a gel manicure my nails are super glossy and the glitter really shines through, almost magnified by the topcoat.
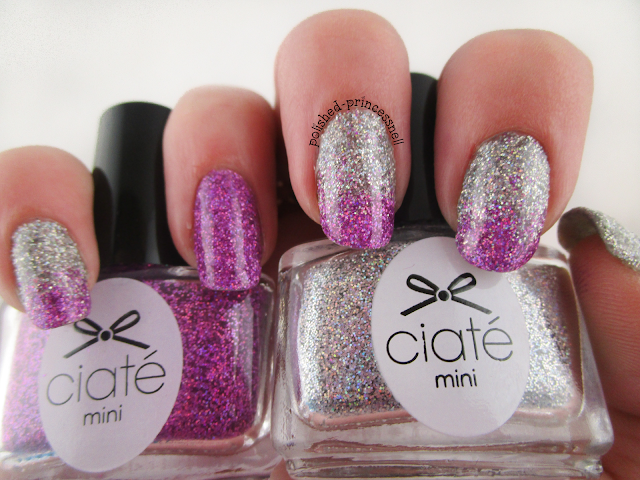
I used two Ciate glitters that I got in my Ciate Mini Manor Advent Calendar last year - a fantastic holographic silver ('Let It Snow') and holographic pink ('Prima Ballerina'). I have been waiting for the perfect opportunity to use these and I think I found it!
I am starting to fall in love with gel manicures - there are so many possibilities using cured polish, and the prettiness lasts for ages too!
Thanks for reading!
Helen x
Today I want to share with you the sparkliest nails that my hands have ever adorned!
 |
| Rockstar Nails |
This is a style nicknamed 'rockstar nails' and it is applied to a gel manicure.
The basic idea is:
- Clean and prep your nails for a gel manicure
- Apply a base coat and cure in an LED/UV lamp
- Apply a thin coat of gel polish and before curing sprinkle fine glitter onto the nail.
- Press lightly onto the nail to ensure the glitter adheres, then cure in your lamp.
- Apply topcoat and cure.
If you want to recreate this look, I recommend heading over to Chalkboard Nails for a great tutorial (the one that I followed), which has each step explained in much more detail than I gave above!
 |
| Super glittery! |
 |
| LOOK AT THE PRETTY! |
This is so easy to create and the effect is absolutely stunning. As this is a gel manicure my nails are super glossy and the glitter really shines through, almost magnified by the topcoat.
 |
| Obligatory macro shot :) |
I used two Ciate glitters that I got in my Ciate Mini Manor Advent Calendar last year - a fantastic holographic silver ('Let It Snow') and holographic pink ('Prima Ballerina'). I have been waiting for the perfect opportunity to use these and I think I found it!
 |
| My camera could only just pick up the holo goodness in these bottles |
 |
| Ciate Fine Holographic Glitter - Prima Ballerina and Let It Snow |
 |
| Can you see the holo shift?! |
I am starting to fall in love with gel manicures - there are so many possibilities using cured polish, and the prettiness lasts for ages too!
Thanks for reading!
Helen x
Labels:
ciate,
gel manicure,
gel nails,
glitter,
holo,
Instagram,
LED lamp,
mani,
manicure,
nail,
nail art,
nail designs,
nail porn,
nails,
pink,
pretty,
rockstar,
silver,
sparkle
Location:
Bristol, City of Bristol, UK
Sunday, 3 May 2015
Le Mini Macaron - Gel Manicure Kit For 'Girls On The Go!'
Hi guys!
Today I have something very exciting to share with you, something I have been waiting to get my hands on for a while, and something that is just too damn cute to miss out on!
Back in January, I funded a campaign on Kickstarter for Le Mini Macaron, which claims to be:
The box contains an LED lamp, USB cable, cuticle pusher, one bottle of gel polish and ten gel removing sachets. The LED lamp is only big enough for one finger (or toe) at a time, but it cures in 30 seconds, making it a speedy alternative to the traditional manicure.
As this is a 'one-step' gel application process, no special topcoats or basecoats are needed to complete your manicure. The instructions state to apply one thin layer of polish, cure, and then apply your thicker, final polish coat and cure again. I found that I required three thin coats, but this is down to personal preference - two was definitely opaque enough.
The colour of the pink polish in my kit (named 'Strawberry Pink') is a pretty, girly pink, and slightly brighter than I was expecting (other colours are available). Application was easy with both coats self-levelling well. After curing for a total of 60 seconds each, my nails were completely dry and boasted a lovely shine and solid finish. I am very, very impressed!
The lamp is adorable, and so light and portable. It holds a 3 Watt LED bulb that cures each coat of gel in just 30 seconds. In order to power the lamp, you connect it to your PC via USB, meaning you can do your nails anywhere! The kit also comes with a wall charger, although this will require a converter for anyone outside of the USA.
After applying your polish, simply pop your finger into the lamp and press the power button on top. This will charge the lamp for 30 seconds, allowing the polish to harden.
One thing I absolutely LOVE about Le Mini Macaron is the secure magnetic top that the lamp has, With a quick twist you can flip the lid around to allow you to cure your tootsies too!
I just love the design of this thing. I can see myself using this all the time - especially when travelling. It is perfect for taking on holiday as it is so compact and quick to achieve fantastic results. I have also tested the lamp out with other 'one-step' gel polishes (such as Fuse), and the results are just as good.
I think this has to be one of the best nail product purchases I have made in a while. It really is the perfect solution for those who want gel manicures at home without any fuss. Le Mini Macaron also have other gorgeous colours available in both lamps and gel polishes, so it is definitely worth checking out their website here. Le Mini Macaron is quickly becoming my new favourite thing! :)
I am sure I will be using this not only as a long-lasting manicure, but also as a base for nail art (as gel polishes are not removed by non-acetone removers).
Thanks for reading!
Helen x
Today I have something very exciting to share with you, something I have been waiting to get my hands on for a while, and something that is just too damn cute to miss out on!
 |
| Le Mini Macaron! |
Back in January, I funded a campaign on Kickstarter for Le Mini Macaron, which claims to be:
"Adorable, affordable gel manicure kits for girls on-the-go! Inspired by the French macaron concept…colorful, flavorful and fun!"
Having never tried a gel manicure before, I was a little apprehensive to go all-out on an at-home DIY gel mani kit. However, I discovered Le Mini Macaron on Instagram, and happily gave my $30 to help the project. For the price of a gel mani in a salon, I was getting my own (really cute) kit and a pretty pink polish too! Bargain! In February the project was fully backed and so Le Mini Macaron went into production. I was thrilled to receive my kit in the post on Saturday morning, and eagerly tested it out!
The box contains an LED lamp, USB cable, cuticle pusher, one bottle of gel polish and ten gel removing sachets. The LED lamp is only big enough for one finger (or toe) at a time, but it cures in 30 seconds, making it a speedy alternative to the traditional manicure.
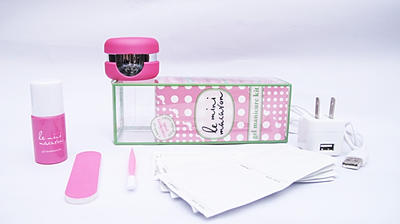 |
| Credit: Le Mini Macaron |
As this is a 'one-step' gel application process, no special topcoats or basecoats are needed to complete your manicure. The instructions state to apply one thin layer of polish, cure, and then apply your thicker, final polish coat and cure again. I found that I required three thin coats, but this is down to personal preference - two was definitely opaque enough.
 |
| Look at the pretty!! |
The colour of the pink polish in my kit (named 'Strawberry Pink') is a pretty, girly pink, and slightly brighter than I was expecting (other colours are available). Application was easy with both coats self-levelling well. After curing for a total of 60 seconds each, my nails were completely dry and boasted a lovely shine and solid finish. I am very, very impressed!
The lamp is adorable, and so light and portable. It holds a 3 Watt LED bulb that cures each coat of gel in just 30 seconds. In order to power the lamp, you connect it to your PC via USB, meaning you can do your nails anywhere! The kit also comes with a wall charger, although this will require a converter for anyone outside of the USA.
 |
| The lamp |
After applying your polish, simply pop your finger into the lamp and press the power button on top. This will charge the lamp for 30 seconds, allowing the polish to harden.
 |
| Le Mini Macaron power switch |
One thing I absolutely LOVE about Le Mini Macaron is the secure magnetic top that the lamp has, With a quick twist you can flip the lid around to allow you to cure your tootsies too!
 |
| It's easy peasy to pedi! |
 |
| Magnets 'clip' the lid to the base |
I just love the design of this thing. I can see myself using this all the time - especially when travelling. It is perfect for taking on holiday as it is so compact and quick to achieve fantastic results. I have also tested the lamp out with other 'one-step' gel polishes (such as Fuse), and the results are just as good.
 |
| Le Mini Macaron |
 |
| Inside the lamp |
I think this has to be one of the best nail product purchases I have made in a while. It really is the perfect solution for those who want gel manicures at home without any fuss. Le Mini Macaron also have other gorgeous colours available in both lamps and gel polishes, so it is definitely worth checking out their website here. Le Mini Macaron is quickly becoming my new favourite thing! :)
I am sure I will be using this not only as a long-lasting manicure, but also as a base for nail art (as gel polishes are not removed by non-acetone removers).
Thanks for reading!
Helen x
Subscribe to:
Posts (Atom)


