Hi everyone!
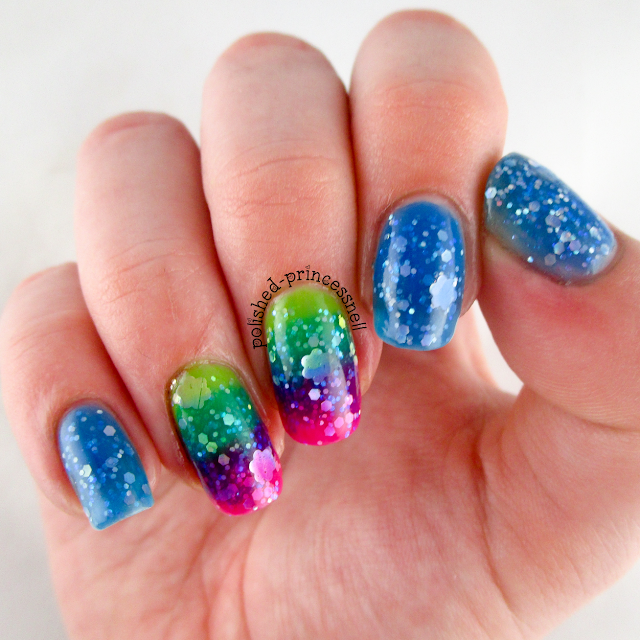
Today's mani is a super bright, super squishy neon jelly glitter sandwich! Woah!
I created this look by layering glitter polish between thin coats of jelly polish, which does take forever as you have to wait for each layer to dry before adding the next, but LOOK AT THE PRETTY!!! For this design I used Kandy Colors 'Retro' (blue), 'Hey Girl' (pink) and 'Carnival' (green) along with Nicole by OPI 'Party Bus' glitter. I picked up 'Party Bus' at TK Maxx for £3.99 and I'm so glad I didn't pay full price for it. Even though I absolutely love the polish, I unfortunately ended up spending a lot of time fishing out the bigger pieces of glitter which is so frustrating! Less clear base and more glitter please, Nicole by OPI!
No glitter jelly sandwich is complete without snapping a few close-ups, so here they are!:
I love jelly polishes and these ones from Kandy Colors really do have the 'wow factor'. But I'm always looking for more to add to my collection! What's your favourite jelly polish?
Thanks for reading!
Helen x
Showing posts with label crafty fingers. Show all posts
Showing posts with label crafty fingers. Show all posts
Monday, 31 August 2015
Glitter Jelly Sandwich Nail Art!
Labels:
awesome,
crafty fingers,
easy nail art,
glitter,
gradient,
gradient nails,
jelly nails,
jelly polish,
nail art,
nail designs,
nail polish
Location:
Bristol, City of Bristol, UK
Tuesday, 18 August 2015
Pretty In Pink Nails
Hi guys,
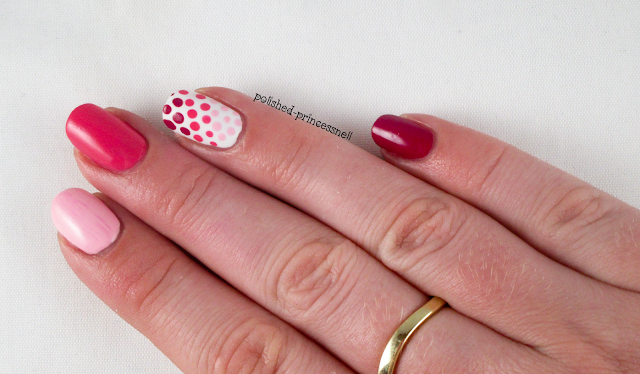
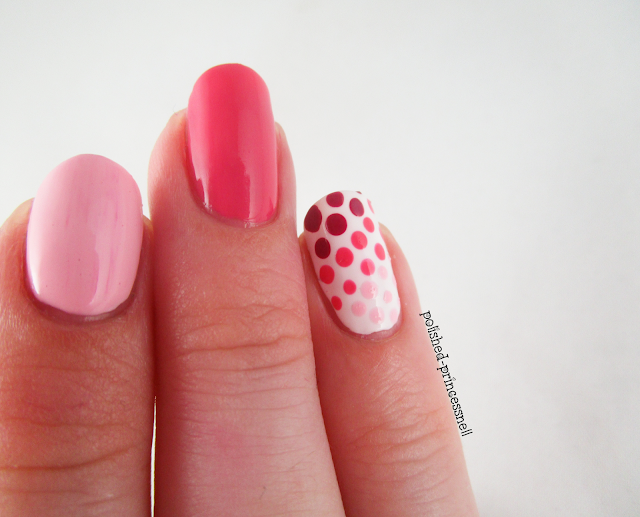
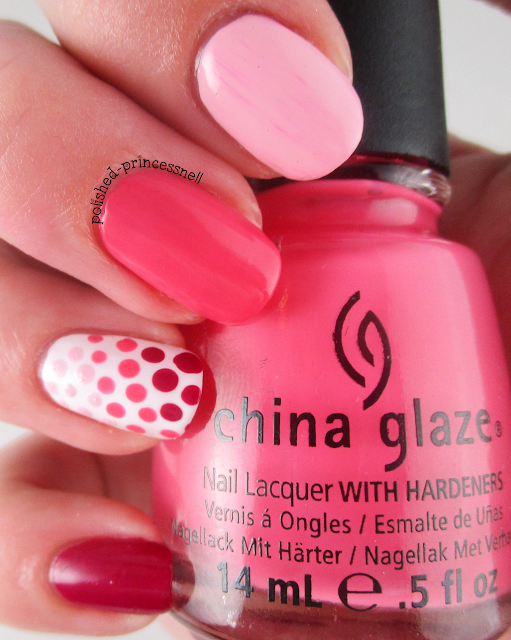
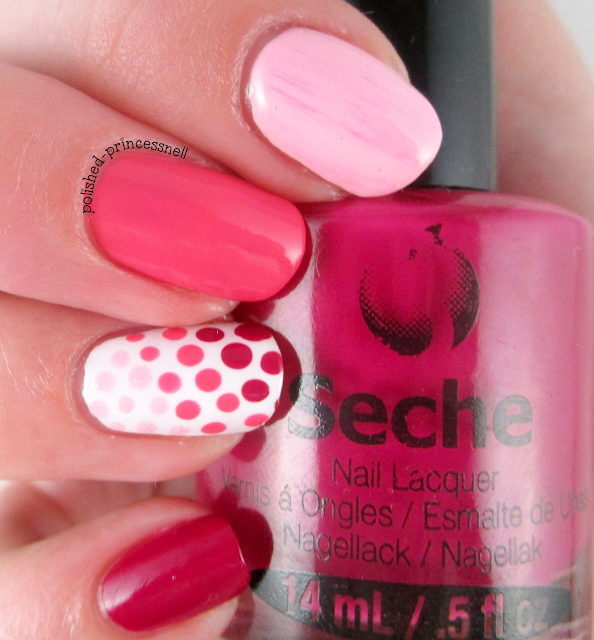
Today I have some super simple and girly nails to show you. This was inspired by UK indie maker PolishedbyLeanne who is giving away her sparkly 'gemstone' polish collection to one lucky winner over on Instagram. And all you have to do is paint your nails pink! Pink is my favourite colour, and I definitely don't use it enough in my nail art, so I really enjoyed this manicure :)
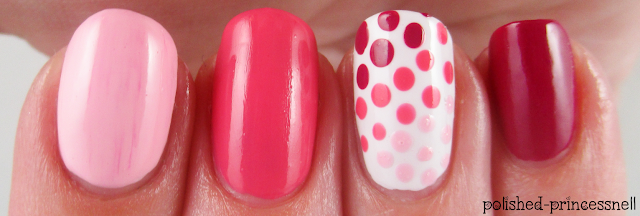
The polishes I used here are Barry M 'Kiss Me Quick', China Glaze 'Sexy Lady', and Seche 'Opulant'. I also used my new fave one-coat white - Essence 'Wild White Ways'. As soon as I placed brush to nail I knew that this was a winner, and such a bargain purchase at only £1.60! I think I need to stock up on this polish as I'll be using it a lot! Unfortunately, my topcoat picked up some of the darker polish and spread it onto the pastel shade, leaving me with a dry-brush effect streak. Lesson learned: don't be so hasty!
For those who are interested in the progress of my stubby little thumb nail after it snapped halfway down about two weeks ago, take a peek at the pic below. Ugh, it still looks so silly! I think I'm going to be leaving her out of photos for a little while yet :(
Thanks for reading!
Helen x
Today I have some super simple and girly nails to show you. This was inspired by UK indie maker PolishedbyLeanne who is giving away her sparkly 'gemstone' polish collection to one lucky winner over on Instagram. And all you have to do is paint your nails pink! Pink is my favourite colour, and I definitely don't use it enough in my nail art, so I really enjoyed this manicure :)
The polishes I used here are Barry M 'Kiss Me Quick', China Glaze 'Sexy Lady', and Seche 'Opulant'. I also used my new fave one-coat white - Essence 'Wild White Ways'. As soon as I placed brush to nail I knew that this was a winner, and such a bargain purchase at only £1.60! I think I need to stock up on this polish as I'll be using it a lot! Unfortunately, my topcoat picked up some of the darker polish and spread it onto the pastel shade, leaving me with a dry-brush effect streak. Lesson learned: don't be so hasty!
 |
| Barry M - Kiss Me Quick |
 |
| China Glaze - Sexy Lady |
 |
| Seche - Opulant |
Thanks for reading!
Helen x
Labels:
bargain,
barry m,
china glaze,
crafty fingers,
easy nail art,
gradient,
Instagram,
manicure,
nail art,
nail designs,
nails,
pink,
pink nails,
seche
Location:
Bristol, City of Bristol, UK
Thursday, 16 July 2015
Polish Me Silly - Lilac Lover Thermal **Swatch**
Hi everyone!
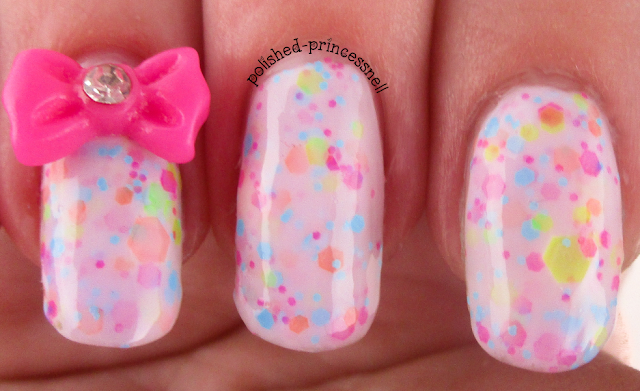
Today I am wearing one of my favourite polishes. 'Lilac Lover' is a thermal crelly polish by indie brand Polish Me Silly and it is just gorgeous. The colour shifts from a creamy white when warm to a deep lilac when cold, and on longer nails the transition is beautiful :)
You can buy this polish in the UK from Rainbow Connection for £9.80, and there are other colours available too! I'm totally going to be purchasing the whole collection at some point.
As you can see, this lacquer is jam-packed full of bright matte glitter in all shapes and sizes. In these swatches I am wearing three coats on each nail as I wanted it quite opaque, but it is also gorgeous with only one or two coats too.
The application is great and you don't have to 'fish around' for pieces of glitter. I also didn't have to spread the glitter at all - this is how it applied first time! Love it!
On my pinkie I added a coat of Kandy Colors 'Hey Girl' which is a neon pink jelly polish. The cute bow is from a set I bought on Amazon.
I am so in love with this polish and this brand that I just can't contain my excitement! I've promised myself that I won't buy any new nail related items in July as I have about 40 polishes that I have bought and not yet used (oops!), but as soon as August comes around I am sure to be buying more Polish Me Silly goodies :)
Thanks for reading!
Helen x
Today I am wearing one of my favourite polishes. 'Lilac Lover' is a thermal crelly polish by indie brand Polish Me Silly and it is just gorgeous. The colour shifts from a creamy white when warm to a deep lilac when cold, and on longer nails the transition is beautiful :)
 |
| Polish Me Silly - Lilac Lover |
You can buy this polish in the UK from Rainbow Connection for £9.80, and there are other colours available too! I'm totally going to be purchasing the whole collection at some point.
As you can see, this lacquer is jam-packed full of bright matte glitter in all shapes and sizes. In these swatches I am wearing three coats on each nail as I wanted it quite opaque, but it is also gorgeous with only one or two coats too.
 |
| Oooooohhhhhh <3 |
The application is great and you don't have to 'fish around' for pieces of glitter. I also didn't have to spread the glitter at all - this is how it applied first time! Love it!
 |
| Lilac Lover when cold (please ignore water droplets - I had to chill my hands somehow! |
 |
| Lilac Lover when warm |
On my pinkie I added a coat of Kandy Colors 'Hey Girl' which is a neon pink jelly polish. The cute bow is from a set I bought on Amazon.
I am so in love with this polish and this brand that I just can't contain my excitement! I've promised myself that I won't buy any new nail related items in July as I have about 40 polishes that I have bought and not yet used (oops!), but as soon as August comes around I am sure to be buying more Polish Me Silly goodies :)
Thanks for reading!
Helen x
Labels:
crafty fingers,
designs,
glitter,
Instagram,
lacquer,
mani,
manicure,
nail,
nail art,
nail designs,
nail polish,
nail porn,
nails,
polish,
polish me silly,
simple nail art,
swatch,
thermal polish
Location:
Bristol, City of Bristol, UK
Monday, 13 July 2015
Nautical Nails
Hello!
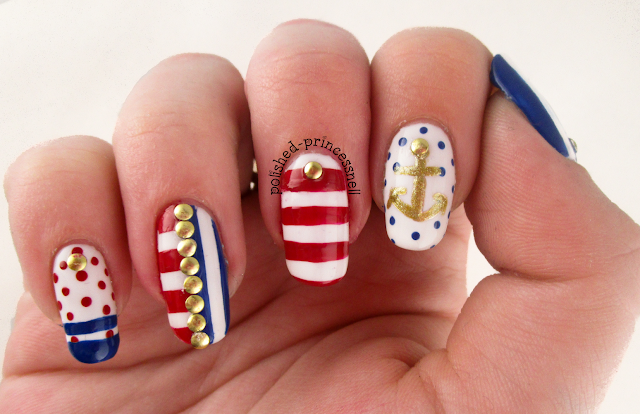
I am very proud of the mani I am showing you today, and I actually think it might be the 'neatest' design that I have created so far! Except for when I added topcoat and smudged it all. Oh well! Here are the nails:
My base for this is Red Carpet Manicure white gel polish. I like to choose a gel base when I know I will be attempting a design that may need a few changes or nails that need completely redoing due to my mistakes. With gel you just wipe away the mistake with acetone-free polish remover and start over!
The red polish I used is OPI 'Cinnamon Sweet', and the blue is Rimmel 'Blue Eyed Girl'. I particularly like the red in this design as it's not a bright 'pillar-box' red or pink toned - I think it's perfectly nautical!
I freehanded the little anchor on my index finger with Models Own 'Gold Chrome' and topped it with Ciate 'Ladylike Luxe'.
I used mini gold discs that I bought in a gem wheel from Poundland to add accents to each nail.
I absolutely love these nails, and hope you do too!
Thanks for reading!
Helen x
I am very proud of the mani I am showing you today, and I actually think it might be the 'neatest' design that I have created so far! Except for when I added topcoat and smudged it all. Oh well! Here are the nails:
The red polish I used is OPI 'Cinnamon Sweet', and the blue is Rimmel 'Blue Eyed Girl'. I particularly like the red in this design as it's not a bright 'pillar-box' red or pink toned - I think it's perfectly nautical!
I freehanded the little anchor on my index finger with Models Own 'Gold Chrome' and topped it with Ciate 'Ladylike Luxe'.
I used mini gold discs that I bought in a gem wheel from Poundland to add accents to each nail.
I absolutely love these nails, and hope you do too!
Thanks for reading!
Helen x
Labels:
awesome,
crafty fingers,
freehand,
gel manicure,
gel nails,
Instagram,
lacquer,
le mini macaron,
LED lamp,
mani,
manicure,
nail,
nail art,
nail designs,
nail polish,
nails,
nautical nails,
summer nails
Location:
Bristol, City of Bristol, UK
Sunday, 12 July 2015
Rainbow Tips!
Hi guys!
Today I have a fun French manicure with a twist to show you!
This mani is super easy to create and didn't take very long at all. I started out with a coat of China Glaze 'Fairy Dust' then added a coat of Jess 'Fresh' iridescent glitter to give the finished look some flakie goodness. I then simply painted the French tips using a range of coloured polishes (see below for details) and finished with a quick-dry topcoat. Et voila!
Today I have a fun French manicure with a twist to show you!
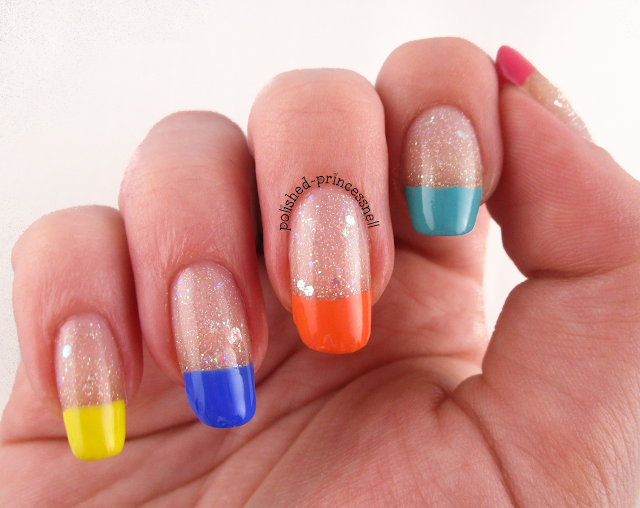 |
| Rainbow French Manicure |
This mani is super easy to create and didn't take very long at all. I started out with a coat of China Glaze 'Fairy Dust' then added a coat of Jess 'Fresh' iridescent glitter to give the finished look some flakie goodness. I then simply painted the French tips using a range of coloured polishes (see below for details) and finished with a quick-dry topcoat. Et voila!
Colours used are (left - right): China Glaze 'Sexy Lady'/ Nicole By OPI 'Teal Me Something New' / NYC 'Summer In NYC' / Barry M 'Damson' / NYC 'Lexington Yellow'
I added a 'splat' design to this manicure using MoYou London Princess plate #09 but I definitely prefer it without. What do you think?
Thanks for reading!
Helen x
Labels:
crafty fingers,
designs,
easy nail art,
fairy dust,
french manicure,
glitter,
Instagram,
lacquer,
mani,
manicure,
nail,
nail art,
nail designs,
nail polish,
nail porn,
nails,
negative space,
polish,
simple nail art
Location:
Bristol, City of Bristol, UK
Sunday, 21 June 2015
**Review** Colourful Loose Glitter - BornPrettyStore
Hi guys!
Today I have a super sparkly review for you that makes me happy inside! BornPrettyStore very kindly sent me some of this mixed loose glitter* to play around with, so of course I covered my nails with it! I don't do subtle.
Today I have a super sparkly review for you that makes me happy inside! BornPrettyStore very kindly sent me some of this mixed loose glitter* to play around with, so of course I covered my nails with it! I don't do subtle.
 |
| ALL OF THIS FOR ONLY $0.99! |
This is a rainbow filled pot of glittery goodness! The diamond shaped glitter comes in a pot full of green, blue, silver, gold, pink/purple, white, black, clear and bronze pieces. Phew!
I wanted to create a similar effect to my glitter framed nails from a little while ago, so I started with a base of Rimmel 'Black Out'. Then by applying a coat of Rimmel 'Clear' polish, I began placing the loose glitter onto my nail using a small dotting tool to position the pieces. The glitter lay flat on the nail and was easy to trim with cuticle clippers in order to get a close fit. Another thing I liked about this particular glitter is that there weren't any clumps of uncut diamonds, which is an issue I've had with other glitters. Plus, after two heavy coats of topcoat the glitter was just as shiny as when I started and almost smooth! It's a big bonus for me that the glitter pieces didn't dull after a topcoat was applied, again as this is a problem I have had in the past with other glitters.
Because there is simply no such thing as too much glitter, I decided to add a coat of China Glaze 'Fairy Dust'.
I'll just leave a few pics here to show you the mini disco ball from a few angles :)
 |
| I couldn't stop admiring my nails when I wore this |
 |
| I even managed to do my left (dominant) hand! |
 |
| A bit blurry but still pretty :) |
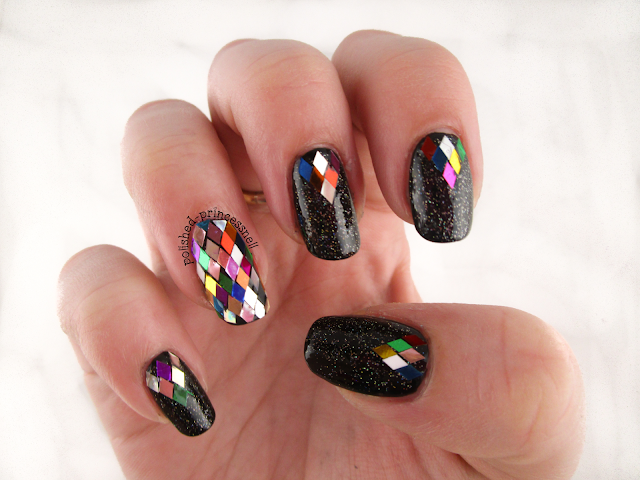 |
| The finished look |
 |
| Get lost in the sparkles... |
 |
| Born Pretty Loose Glitter and China Glaze = ALL OF THE SPARKLE! |
I hope you like this as much as I do. And *PLEASE* go to BornPrettyStore.com, pop a few (amazingly priced) items into your cart, enter my exclusive code CESH10 to receive 10% discount, enjoy the totally free international shipping, and enjoy playing with your goodies when they arrive. I promise you'll be back for more!
Thanks for reading!
Helen x
*Items provided by BornPrettyStore for my impartial review
Labels:
born pretty store,
crafty fingers,
designs,
fairy dust,
gems,
glitter,
glitter placement,
Instagram,
lacquer,
mani,
manicure,
nail,
nail art,
nail polish,
nail porn,
nails,
polish,
pretty,
review,
shopping
Location:
Bristol, City of Bristol, UK
Sunday, 10 May 2015
High Heels and Suspenders!
Hi everyone!
Last night I decided to make my own sheer tints in order to create a look I've been wanting to try for ages:
To create my own tints, I simply used a cheap clear polish (this one from Poundland), poured a little out to make room, and added drops of Barry M 'Black' testing after every few drops to check the opacity. For the tint shown in this manicure, there are around 8 drops in the bottle and I used two coats on the nail. I also repeated this with a red polish (using Collection 'Lady In Red'), however I required quite a large number of drops added to the clear base in order to make it red-tones and not pink.
I decided to name my new tints 'High Heels' and 'Suspender'! In keeping with the theme, I chose Essence 'The Black Cat' polish to add detail - this has a wonderful latex look about it, drying not-quite-shiny and not-quite-matte. You can pick it up in Wilko for £2!
I layered two coats of my black tint to my thumb, index and pinkie finger, then two layers of my red tint to my middle and ring fingers. I added Sally Hansen Insta-Dry Topcoat at this stage to dry the tints, and to give some longevity to the polish. I didn't use topcoat again in this manicure as I wanted the latex effect to be apparent.
Using a dotting tool and a striping brush, I created polka dots and stripes which remind me of saucy stockings! My ring finger is inspired by a corset, and I love how it all turned out!
Using silver caviar beads, silver striping tape, and a couple of studs I added some much needed bling to this manicure. I found the caviar beads and studs in Poundland (seriously, get yourself over to your nearest Poundland!), and my striping tape is from Amazon.
What do you guys think of this? Have you tried making your own tints before? I have a feeling that I will be franking a lot of my own shades now - it's so easy, so fun and totally unique! There's a great overview on Girly Bits Cosmetics which outlines the do's and dont's of mixing your own polish.
Thanks for reading!
Helen x
Last night I decided to make my own sheer tints in order to create a look I've been wanting to try for ages:
 |
| 'High Heels and Suspenders' |
To create my own tints, I simply used a cheap clear polish (this one from Poundland), poured a little out to make room, and added drops of Barry M 'Black' testing after every few drops to check the opacity. For the tint shown in this manicure, there are around 8 drops in the bottle and I used two coats on the nail. I also repeated this with a red polish (using Collection 'Lady In Red'), however I required quite a large number of drops added to the clear base in order to make it red-tones and not pink.
I decided to name my new tints 'High Heels' and 'Suspender'! In keeping with the theme, I chose Essence 'The Black Cat' polish to add detail - this has a wonderful latex look about it, drying not-quite-shiny and not-quite-matte. You can pick it up in Wilko for £2!
 |
| L-R: DIY black tint / The Black Cat / DIY red tint |
I layered two coats of my black tint to my thumb, index and pinkie finger, then two layers of my red tint to my middle and ring fingers. I added Sally Hansen Insta-Dry Topcoat at this stage to dry the tints, and to give some longevity to the polish. I didn't use topcoat again in this manicure as I wanted the latex effect to be apparent.
Using a dotting tool and a striping brush, I created polka dots and stripes which remind me of saucy stockings! My ring finger is inspired by a corset, and I love how it all turned out!
Using silver caviar beads, silver striping tape, and a couple of studs I added some much needed bling to this manicure. I found the caviar beads and studs in Poundland (seriously, get yourself over to your nearest Poundland!), and my striping tape is from Amazon.
 |
| I lost a caviar bead! Noooo! |
What do you guys think of this? Have you tried making your own tints before? I have a feeling that I will be franking a lot of my own shades now - it's so easy, so fun and totally unique! There's a great overview on Girly Bits Cosmetics which outlines the do's and dont's of mixing your own polish.
Thanks for reading!
Helen x
Labels:
black,
corset,
crafty fingers,
freehand,
gems,
Instagram,
latex,
mani,
manicure,
nail,
nail art,
nail designs,
nail polish,
nails,
polish,
sheer tints,
stockings,
studs
Location:
Bristol, City of Bristol, UK
Monday, 4 May 2015
Fairy Dust and Framing
Hi lovelies!
Last weekend I bought my first ever bottle of China Glaze 'Fairy Dust' - I was so excited when I got home that I tested it out straight away. I haven't seen another glitter like it - the specks are so fine and yet super holograpic - it truly is a spectacular topper!
Not content with just Fairy Dust, I added extra sparkle to this mani with Nicole By OPI 'Awesome' as glitter placement around my nails, framing them.
I chose Barry M's 'Black' as my base, and added one layer of Fairy Dust over the top. Then, decanting Awesome onto a piece of paper, I picked up the glitter using a dotting tool and created a frame around each nail. I love how this turned out and was actually very quick and easy to do!
Last weekend I bought my first ever bottle of China Glaze 'Fairy Dust' - I was so excited when I got home that I tested it out straight away. I haven't seen another glitter like it - the specks are so fine and yet super holograpic - it truly is a spectacular topper!
 |
| China Glaze - Fairy Dust |
Not content with just Fairy Dust, I added extra sparkle to this mani with Nicole By OPI 'Awesome' as glitter placement around my nails, framing them.
 |
| Nicole By OPI - Awesome |
 |
I topped this all off with two layers of Barry M 'Plumpy' to make it as smooth as possible, although the glitter did start peeling at the edges after about 12 hours. For someone who changes their manicure daily, this isn't so much of a problem, but if you want extra staying power on the glitter make sure to use a small amount of nail glue to keep them in place :)
Thanks for reading!
Helen x
Labels:
awesome,
barry m,
black,
china glaze,
crafty fingers,
fairy dust,
framed nails,
glitter,
Instagram,
mani,
manicure,
nail,
nail art,
nail designs,
nail polish,
nails,
opi,
polish,
pretty,
sparkle
Location:
Bristol, City of Bristol, UK
Subscribe to:
Posts (Atom)
